Welcome back to Magenta
Super Saturday. This sentiment is another one of my favorites and today
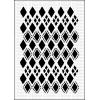
I’m using it for a thank you card. I combined it with the Rows of Diamonds
stencil for a card that I hope will make the recipient smile. You can
also see my card on the Magenta blog here.
I started by taping my
card stock to the back of the Rows of Diamonds stencil, then placing it on my
Wendy Vecchi Stay-Tion. I love this new
tool for working with stencils - the magnets hold the stencil firmly in place
but they are easier to move than the magnets we are used to in our stamping platforms
like the MISTI.
I applied a rainbow
palette of Distress inks over the stencil (I’ve listed the colors below.)
Without moving the stencil, I used a microfiber cloth to gently wipe the ink
from the stencil then I used VersaMark cube to apply ink all over the colored
areas. (I like the cube size of the VersaMark ink for this type of applicationg
because you can get into all the small spots on the stencil more easily.) I removed the stencil, covered the image with
clear embossing powder and heat set it. I applied Distress Antique Linen
ink to “age” the paper then wiped the image again with a microfiber cloth to
remove the ink from the embossed areas. Next I trimmed the piece to 4
1/8" x 5 1/4" then used a rectangle die to cut out the center of the
cardstock. You could also use an X-acto knife to cut out the
rectangle.
I applied foam tape to the
back of the image so it would be raised above the sentiment on the completed
card.
Next I stamped the
sentiment on a separate piece of cardstock with VersaFine Vintage Sepia, embossed with clear embossing
powder then applied Distress Antique Linen over the image. I centered the
stenciled piece over the sentiment, the adhered that to a piece of So Silk
Glamour Green cardstock that had been adhered to an A2 card.
After the
card was assembled, I sprayed it lightly with Imagine Craft Shimmer Spritz to
add a bit of sparkle, then added a few gems for just a bit more sparkle.
This card came
together very quickly so it would be easy to make several (in a variety of
colors) to have a stash of multi-purpose cards.
Thanks for visiting my blog today.
Magenta Products Used
Other Products Used
Distress Inks (Picked Raspberry, Dried Marigold, Squeezed Lemonade, Twisted Citron, Salty Ocean, Wilted Violet)
Wendy Vecchi Make Art Stay-Tion
Imagine Craft Shimmer Spritz
VersaMark
VersaFine Vintage Sepia Ink