Friday, December 10, 2021

Magenta Super Saturday - Christmas Decorations

Welcome back to my blog and Magenta Super Saturday. Today I used two stamps from Magenta’s 2021 Fall and Christmas release.  You can also see my card on the Magenta blog here

I stamped the Christmas Decoration stamp on a piece of white cardstock using my MISTI by placing the cardstock in the left corner.  I also stamped the image separately on a piece of masking paper, then cut out the image and placed it over the image stamped on the cardstock.  I left the stamp in my MISTI.  
Since I needed to stamp the script stamp twice to fill the background of the card, I practiced the next step a couple of times on scrap paper.  I found that the Christmas Song stamp was very easy to line up. I put the stamped image (with the mask on top) in the right corner of my MISTI, then positioned the Christmas Song stamp on the top section.  I stamped with Gray Smoke VersaFine ink, then repositioned the stamp to the bottom section of the card and stamped again. 
I removed the mask, then colored the image with Caran D’Ache Luminance pencils – I love these pencils because they blend so well.  Once I was done coloring, I returned the stamped image to my MISTI, restamped the Christmas Decoration image using VersaMark ink, and embossed with gold embossing powder.  I trimmed the image to 3 ¾” x 5”, matted it with a piece of dark green cardstock cut to 4” x 5 ¼”, then adhered it to a white A2 card.  I added a few sequins for a little bit of sparkle. 

Thanks for visiting my blog today. 

Magenta Products Used:

02.326.Q - Christmas Decoration

07.1065.N - Christmas Song

Other Products Used:

VersaFine Smokey Gray Ink

VersaMark Ink

Caran d'Ache Luminance Pencils

Brutus Monroe Gilded Gold Embossing Powder


Friday, November 12, 2021

Sparkling Autumn Birthday

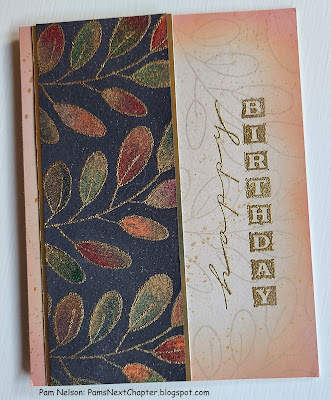
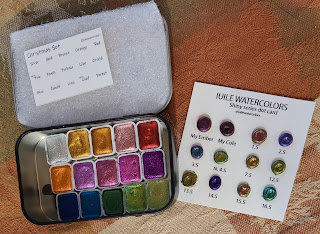
Welcome back to my blog and Magenta Super Saturday. Today I used my sparkly Iuile watercolor paints to create a fall themed birthday card.  You can see my card on the Magenta blog here.  I love the sparkle from the Iuile’s paints.  Kristina Werner uses them frequently on her blog posts.  My card was inspired by one of her videos which you can see here.

I stamped the large Acacia branch repeatedly on a piece of Stonehenge black watercolor paper that was cut to 2” wide by 5 ½”.  I have found that this paper cuts best with a guillotine cutter.   Before stamping I generously used my powder tool over the surface of the paper, stamped with VersaMark ink, then embossed with gold embossing powder. 

I painted the leaves using a variety of fall colors – gold, orange, red and green, from Iuile's Christmas set and Shiny Series.  All of these paints are so beautiful but they are especially beautiful when used on dark paper.  For a bit more sparkle I lightly splattered gold watercolor on top. When the water-colored piece was dry, I adhered it to a piece of gold metallic paper that was cut to 2 ¼” x 5 ½”. 
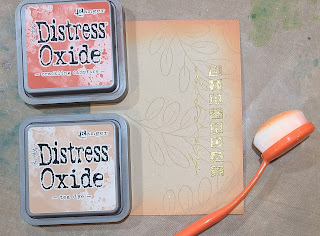
I created an A2 card with Kraft cardstock, then stamped the acacia branch repeatedly on the right side of the card with VersaMark ink then dried the ink with my heat gun. 
I stamped the vertical happy birthday stamp on the right side of the card, then embossed it with gold embossing powder.  I applied Tea Die Distress Oxide ink around the outer edges of the card, followed by Crackling Campfire then splattered a bit more gold watercolor paint for a bit more sparkle.  To complete the card, I adhered the water-colored strip to the left side of the card.

Thanks for visiting my blog today. 

Magenta Products Used:

07.430.I - Happy Birthday

0817.M - Acacia Branch Large

Other Products Used:

Iuile Watercolors (available from Etsy.com)

Stonehenge Aqua Coldpress Black Watercolor paper

Distress Oxide Ink (Tea Dye, Crackling Campfire)

VersaMark Ink

Brutus Monroe Gilded Gold Embossing Powder


Friday, October 15, 2021

Magenta Super Saturday - Peace on Earth

Welcome back to my blog and Magenta Super Saturday.  Today I have another card made a stamp from Magenta’s 2021 Holiday release.  I love this new poinsettia stamp and thought it would be perfect for no-line water coloring.  You can also see my card on the Magenta blog here.  

I placed the stamp in my stamp positioner, stamped with Distress Antique Linen ink on a piece of watercolor paper. 
After the ink dried, I used Distress Inks to paint the image. 
I tapped the Distress Ink onto a paint palette, then used a small paint brush to paint the image. 
I wanted the color to be deep so I only used a tiny bit of water periodically to help blend the ink. 
I used metallic gold from the Gansai Tambi Starry Colors watercolor set to paint the accents on the center of the poinsettia and the shading marks on the poinsettia petals. On a piece of 4 ¼” x 5 ½” Paper Accents textured white paper, I stamped the “Peace on Earth” sentiment in VersaFine Black Onyx ink and embossed with clear embossing powder.  Then I used a 3 ½” circle die from the Life Style Crafts Nested Circle die set to cut the opening and centered the cut piece over the poinsettia image. 
To create the frame, I used the large 4” die from The Greetery Nordic Circles set to cut a circle from the same white textured cardstock, then used the 3 ½” die on the same circle to cut a frame.  I adhered the frame to the front of the card then adhered everything to an A2 card.   

Thanks for visiting my blog today. 

Magenta Items Used:


02.327.P - Christmas Flower Poinsettia


07.457.H - Peace on Earth

Other Products used:

Distress Ink (Crackling Campfire, Rustic Wilderness, Mustard Seed, Wilted Violet, Blueprint Sketch)

The Greetery Nordic Circles

Gansai Tambi Starry Colors

VersaFine Black Onyx

Life Style Crafts Nested Circles

Paper Accents White Textured Paper

Friday, September 24, 2021

Magenta Super Saturday - O Christmas Tree!

Welcome back to my blog and Magenta Super Saturday.  Today I am using the new Christmas tree stamp from Magenta’s 2021 Holiday release.  You can also see my card on the Magenta blog here

I placed the stamp in my stamp positioner, stamped with VersaFine Black Onyx ink on a piece of white cardstock, then used Prismacolor colored pencils to color the image.  I returned the stamp to my stamp positioner, stamped with VersaMark ink, and embossed with Judikins Pine Twinkle embossing powder.  I shaded the outer edges around the tree with Distress Tumbled Glass Oxide ink. 
To create the frame, I cut a piece of red linen cardstock and two pieces of 65# white cardstock to 4” x 5 ¼”.  I stacked all three pieces together and cut them with the Penny Black Stitched Frames frame die.  This process ensures all three pieces are cut in the same position.  If the die doesn’t cut through all three pieces of cardstock, lift off the cut layer then just fit the die back into imprint on the next layer, and die cut again.  Glue all three layers together then trim down the stamped image to fit behind the frame.  Glue the frame to the stamped image, then to the front of an A2 card.  To finish I added some Nuvo White Blizzard glitter drops in the background for a bit more sparkle.

Magenta Products Used:


Other Products Used:
VersaFine Black Onyx Ink
VersaMark Ink
Judikins Pine Twinkle Embossing Powder
Penny Black Stitched Frames die set (#51-709)
Nuvo White Blizzard Glitter Drops
PrismaColor Pencils
Distress Oxide Tumble Glass Ink


Friday, September 3, 2021

Magenta Super Saturday - New Stamps!

Welcome back to Super Saturday.  Today I am using the beautiful bird stamp from Magenta’s most recent release of new stamps. You can also see my card on the Magenta blog here.

I used water-based TomBow markers to color the image on the back of vellum – I just love this technique. You can also used alcohol based markers (Copic) or colored pencils - each medium provides a beautiful result.  I cut a piece of 29# vellum to 4 ¼” x 5 ½”.  I used my powder tool very liberally over the surface, stamped the bird image using VersaMark, then sprinkled Brutus Monroe Gilded Gold embossing powder over the top.  To heat emboss the image I warmed up my heat gun for about 30 seconds then kept it moving over the entire surface of the paper to slowly melt the embossing powder without warping the vellum. 

I selected several green markers and began coloring the leaves on the back side of the stamped image.  It takes a bit longer for the ink to dry on the vellum which provides more time for blending the colors.  I've listed all the colors I used below.

Once I completed the leaves I moved on to the bird, berries, and the fence posts. 
I wanted a colored background for the bird and at first I thought about coloring in that area on the vellum.  Instead, I blended Tumbled Glass and Mermaid Lagoon Distress Oxide inks onto a piece of white cardstock, putting the lighter color in the center, and the darker color around the outer edges.  This will go under the vellum layer to create blue shading.  
I used 4 3/8” and 4 5/8” oval dies from the Hero Arts Infinity Dies to create a frame for the bird.  To create this look, I cut a piece of white cardstock and green cardstock to 4 ¼” x 5 ½”.  I used the 4 5/8” oval die to cut the opening in the white cardstock, then adhered this to the green cardstock.  I centered the smaller oval die in the opening, taped it down and ran it through my die cut machine. 
Next, I adhered the bird, embossed side up, to the back of the frame, adhered this to the inked blue background and finally adhered them to the front of an A2 card. 

Magenta Products Used:
0827
The new stamps aren't available in the store yet so to order them, please e-mail Magenta and provide the stamp number.

Other Products Used:
Brutus Monroe Gilded Gold embossing powder
TomBow Markers ((Leaves: 245, 346, 195); (Bird: 25, 885, 905, 847): (Berries: 847, 565); (Fence 899, 977))
Distress Oxide Ink (Tumbled Glass, Mermaid Lagoon)
VersaMark
Hero Arts Infinity Dies - Nested Oval 


Friday, August 6, 2021

Magenta Super Saturday - Rainbow Greetings


Welcome back to my blog and Magenta Super Saturday.  Today I have a card that can be made very quickly.  It was inspired by a Kristina Werner video which you can see here.  I used Karin Watercolor markers, but I also think other water-based markers like Tombow or Zig would work well. You can also see my card on the Magenta blog here.  

To begin, I used VersaMark ink to stamp the greeting on a panel of watercolor paper that measured 5 ½” x 4 ¼”.  I embossed the stamped image with Brutus Monroe Gilded gold embossing powder, then taped the panel to my glass mat to prevent it from curling. 
I selected several markers in bright colors.  The colors I used are listed below. 
I colored diagonal stripes in rainbow order across the watercolor panel, leaving a small open space between each color to allow for blending.  To blend the colors, I dipped a 1/2” brush in water, then blotted it off on a towel. 
I started in the upper left corner and brushed over the green and blended it into the yellow.  I rinsed my brush, blotted off the excess water, then painted over the yellow and blended it into the orange. You can always pick up a tiny bit more water on your brush to help the blending process.  If you get too much water on your panel you can always dab it off with a paper towel.  I followed this process with each color, then let the panel dry.  You can also use a heat gun to try the panel if you prefer.
I decided I wanted to make the colors a bit more vibrant, so I added a second layer of color using the same process as above.  You don’t need very much water for the colors to blend.
When the panel was dry, I removed the tape, then used a die to cut the panel to 3 ¾” x 5”.  I also used the same die to cut two pieces of 65# white cardstock to the same size.  I adhered all the pieces together, then adhered them to the front of a white A2 card.  The extra white panels raise the painted image off the card and create a bit of dimension.  I added a few sparkly gems, and the card was complete.
I decided to make some thank you cards and followed the same process except I embossed with Brutus Monroe Alabaster white embossing powder.  The finished card is an A1 or announcement size card – the folded size is 3 ½” x 5”.  It would be easy to make several of these cards at once to have on hand or to make a set of cards to give as a gift. Thanks for visiting my blog today. 

Magenta Items used:

07.999.N - Happy Birthday

07.979.G - Thank You

Other Items Used:

Karin Brushmarker Pro (Grass, Canary, Amber, Magenta Red, Violet Blue, Royal Blue)

VersaMark Ink

Brutus Monroe Gilded Gold Embossing Powder

Brutus Monroe Alabaster Embossing Powder


Friday, July 9, 2021


Welcome back to my blog and Magenta Super Saturday.  Today I have a card that is very quick and easy which you can also see on the Magenta blog here. 

I pulled a piece of background paper from my stash.  This particular piece was made using shaving cream and Nuance.  You can see my post on how to make the paper here. 

I selected this piece because I liked the swirl design and I thought it would work well with the Dandelion Trio stamp.  I cut the background paper to 4 ¼” x 5 ½” and adhered it to the front of an A2 card.  You can certainly use any paper, or scrapbook paper; just experiment by holding your vellum over the background paper to see which one you like the best. 
I cut a piece of medium weight vellum to 4 ¼” x 5 ½” and liberally used my powder tool over the entire surface then placed it in my stamp positioner.  The Dandelion Trio stamp is a two-piece set and I positioned the piece with two dandelions on the left side of the vellum.  I positioned the sentiment on the right side of the vellum and stamped both images at the same time with VersaMark ink.  I embossed with Brutus Monroe Gilded Gold embossing powder.  When embossing on vellum it is important to pre-heat your embossing tool and to keep it moving over the surface of the paper to keep the paper from warping or melting while the embossing powder melts.
I applied VersaMark ink around all four sides of the stamped image and then embossed with more gold embossing powder.  You can do this step multiple times until you have the amount of gold around the edges that you like.

On the back of the vellum, I applied small drops of glue under the gold and under parts of the stamped image.  By putting the glue under the gold embossing powder, it won’t show through to the front of the vellum.  I adhered the vellum to the front of the card and then put a book on top of the card to weigh down the vellum until the glue dried.  For the final step I added a few gold gems. 

Thanks for visiting my blog today. 

Magenta Products Used:

07.817.H - May the Love

0762.P - Dandelion Trio
MNUC - Nuance
Other Products Used:
Brutus Monroe Gilded Gold Embossing Powder
VersaMark Ink