
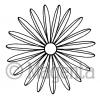
Daisies
always seem like such happy flowers to me so I thought the new large Painted
Daisy would be perfect for today’s card.
You can also see my card on the Magenta blog here.

I put the stamp in my stamp positioner and stamped on five
different pieces of Bristol 110# white cardstock with VersaFine Smokey Gray
Ink. I painted each flower with Zig
Clean Color markers in shades of yellow, pink and orange (all the specific colors
are listed below.) After the ink was
thoroughly dry, I returned each image to my stamp positioner, then restamped
with VersaMark ink. I embossed them with
Brutus Monroe Gilded embossing powder, then cut out each flower.

For the card background paper, I applied Broken China, Salty
Ocean and Blueprint Sketch Oxide inks to a piece of 4 ¼” x 5 ½” white cardstock
and then sprinkled a few water droplets on top and let them dry. I repeated the
process on a second piece of cardstock, so I would have a piece for the
sentiment. On the second piece, I also
splattered gold paint over the paper because I planned to emboss my sentiment
in gold.


I adhered the first piece of background paper to and A2 card
then started arranging the flowers on top.
I had originally planned to put all five flowers on the card so the card
would be covered with lots of color. As
the card came together, I decided that I liked it with three flowers (and then
I used the remaining two flowers on another card.) I adhered the flowers to the front of the card,
then trimmed the edges of the flowers even with the card front.


Next, I ended up changing the sentiment and instead of stamping it on white like in the picture above, I stamped it on the second
piece of blue background paper and embossed it with Brutus Monroe Gilded embossing powder. I cut a small strip of white cardstock a bit
larger than my sentiment strip then decided I wanted it to have the same colors
as the flowers. I scribbled some ink
from three Zig markers (Pink, Yellow and Orange) onto my glass mat and spritzed
with water. Then ran the white strip
through the ink. When I had the color the
way I wanted it, I set it aside to dry.
I adhered the sentiment strip with a bit of fun foam behind
it to add dimension. After I assembled
the card, I added glossy accents to the center of the flowers and add added a
few gemstones for a bit of sparkle.

For the second card, I made another piece of blue cardstock
using a piece of white cardstock cut to 4” x 5 ¼”. I splattered it with water and some gold
paint. I adhered the two flowers on top,
then trimmed the petals even with the edges.
I adhered this to an A2 card. I
stamped the sentiment on white cardstock, embossed with gold embossing powder
and used die to cut a circle. I scribbled Pink, Orange and Yellow Zig markers
on my glass media mat, and with a slightly wet paint brush picked up the ink
and sprinkled it onto the sentiment piece.
I used a slightly larger circle
die to cut a piece of the blue background paper and adhered the sentiment piece
on top. I added a piece of fun foam to
the back for dimension then I added a few gemstones for some sparkle.
Thanks for visiting my blog today!
Magenta Products Used:
 |
| 0815.N - Painted Daisy Large |
 |
| 07.952.F - Sending you Sunshine |
 |
| 07.674.F - Circle of Friends 3 |
Other Products Used:
Zig Clean Color Brushes (Light Pink, Pink, Dark Pink, Tea Rose, Sugared Almond Pink, Lemon Yellow, Yellow, Bright Yellow, Orange, Scarlet Red, Red, Carmine Red)
Brutus Monroe Gilded Embossing Powder
VersaMark Ink
VersaFine Smokey Gray Ink
Distress Oxide (Broken China, Salty Ocean, Blueprint Sketch)


