Friday, August 5, 2022

Magenta Super Saturday - Peace on Earth

Welcome back to my blog and Magenta Super Saturday.  It’s time for me to get started on my Christmas cards so I decided on the Christmas Holly Bird for my first card of the season. 

You can also see my card on the Magenta blog here.  I used VersaFine Vintage Sepia to stamp the image on white cardstock, then used colored pencils to color the image.  I restamped the image using VersaMark ink, then embossed with clear embossing powder.  I lightly shaded the background area with Distress Tumbled Glass ink.  To create the circle frame, I die cut a piece of textured white cardstock with a stitched circle die.  I stamped the sentiment on a piece of white cardstock then cut it out with a stitched banner die and added a bit of shading with Tumbled Glass ink.  I assembled the card then added glossy accents on the berries along with a few jewels for added sparkle. On a personal note, life is taking me in different directions so I’ve decided to step down from the Magenta Design Team.  It has been so much fun working with these talented ladies for the last several years.  Thanks for all your lovely comments on my posts.

Thanks for visiting my blog today. 

Magenta Products Used


Other Products Used

Prismacolor Pencils

VersaMark Ink

Vintage Sepia VersaFine Ink 

Tumbled Glass Distress

Memory Box Stitched Circle Dies

Elizabeth Craft Stitched Banner Dies

Friday, July 8, 2022

Magenta Super Saturday - Keep a Green Tree in Your Heart

Welcome back to my blog and Magenta Super Saturday.  Today I used the new “Bare Tree” stamp from Magenta’s most recent release. You can also see my card on the Magenta blog here.

I began by cutting a circle mask from a piece of masking paper. 
I used Mustard Seed and Wild Honey Distress inks to create a sun on a piece of white cardstock.  I placed the circle cutout over the inked sun, then created a sky background using Tumbled Glass, Salty Ocean and a bit of Mermaid Lagoon Distress inks. 
I positioned the tree stamp in my stamp positioner and inked it with TomBow markers and Distress inks.  I stamped the tree again with another shade of green inks and continued until I was happy with the stamped image.  I stamped the ”Flock of Geese” stamp twice with black ink so the image covered the width of the card.   I shaded the area under the tree with Shabby Shutters Distress ink, then stamped the sentiment.  To finish off the card, I used the largest die from the Penny Black Stitched Frames die to cut a frame from white cardstock that I had shaded with Tea Dye Distress ink.  I adhered the frame on the card and then to the front of an A2 card. 

Thanks for visiting my blog today. 

Magenta Products Used:

0834.P - Bare Tree

42.220.G - Flock of Geese

07.482.I - Keep a Green Tree

Other Products Used:

Distress Inks

Penny Black Stitched Frames (#51-709)

Friday, June 17, 2022

Caring Heart


Welcome back to my blog and Magenta Super Saturday. 

I used the new “From the Heart” stamp for today’s card.  You can also see my card on the Magenta blog here. 
I inked half of the stamp with Picked Raspberry Distress ink and stamped it on white cardstock, then inked up the other half of the stamp with Salty Ocean Distress ink.  The colors overlap in the center to create a shade of purple.  I repeated the process a couple of times until I was happy with the depth of color.  I used a die to cut out a heart shape and also cut two more hearts and glued all three pieces together.  
For the corner background I switched to lighter colors of ink (Spun Sugar, Tumbled Glass and Shaded Lilac.)  I placed the stamp in the upper left corner and inked with Spun sugar on the outer edge and Shaded Lilac toward the middle.)  I moved the stamp to the right, inked the center with Shaded Lilac and then Tumbled glass.  I cut the paper at an angle for the upper left side of the card.  I stamped the sentiment on the bottom of a piece of 3 ¾” x 5” white cardstock, added the background piece to the upper corner, a strip of silver metallic paper, then adhered the heart.  I adhered the whole piece to a piece of navy blue cardstock, then to an A2 card. 

Thanks for visiting my blog today. 

Magenta Products Used:

07.817.H - May the Love

Other Products Used:

Distress Ink
Hero Arts Heart Infinity Dies

Friday, May 20, 2022

Magenta Super Saturday - Happy Birthday

Welcome back to my blog and Magenta Super Saturday.  You can also see my card on the Magenta blog here

For today’s card I started with a piece of white cardstock and used a blending brush to lightly cover it Salty Ocean Distress Ink. 
Next, I stamped the Wild Miscanthus stamp Peeled Paint Distress ink.  I added more color to the stamp with TomBow markers and stamped again.  I cleaned the stamp and stamped one more time with VersaMark ink, then embossed with clear embossing powder.  I moved the stamp and repeated the process two more times.   I added shading around the top edge with Chipped Sapphire Distress Ink.  I stamped the branch stamp along the lower part of the grasses with Distress Inks and Tombow markers.  I adhered the cardstock to the front of an A2 card, then adhered a 1 ½” x 5 ½” strip of blue cardstock along the bottom.  I added a small strip of metallic silver paper along the top edge of the blue strip.  I stamped Happy birthday onto a piece of scrap cardstock that had been covered with Salty Ocean Distress Ink, then die cut it with a circle die.  I adhered it to a slightly larger silver circle, then adhered them to the front of the card

Thanks for visiting my blog today. 

Magenta Products Used:

0648.N - Wild Micanthus

0677.N - Branch

07.1028.D - Happy Birthday

Other Products Used:

Distress Inks

TomBow Markers

VersaMark Ink


Friday, April 22, 2022

Magenta Super Saturday - Hope

Welcome back to my blog and Magenta Super Saturday.  

For today’s card I stamped the Spring Warbler on a piece of white cardstock, then colored with Prismacolor pencils. You can also see my card on the Magenta blog here

I restamped with VersaMark ink and embossed with gold embossing powder.  I die cut the image using the Sizzix Stacked Archway dies, then used Salty Ocean Distress ink to shade the edges of the die cut.  I also cut two more die cuts and glued all three pieces together. 
For the background piece I applied Ripe Persimmon Distress ink through the Tumbled Leaves stencil onto a piece of watercolor paper that I had previously colored with Nuance powders.  I stamped the sentiment on a piece of white cardstock and embossed with gold embossing powder.  I trimmed it to 3 7/8” x 1 ¼” and also cut two more strips the same size.  I adhered all three pieces together.  I adhered the background to a white, A2, then adhered the stamped image and the sentiment.  I added a few sequins for some sparkle.   

Thanks for visiting my blog today.

Magenta Products Used:

40.348.N - Spring Warbler

07.513.I - Hope


TM321 - Tumbling Leaves Duo

Other Products Used:

Prismacolor Pencils

Sizzix Tim Holtz Stacked Archway Dies

Friday, April 1, 2022

Magenta Super Saturday - Spring Daisies

Welcome back to my blog and Magenta Super Saturday.  For today’s card I used Distress inks to watercolor the image
I positioned the large and small daisy stamps in my MISTI then used Mustard Seed Distress ink to stamp the images on a piece of watercolor paper.  I used a very damp brush to blend the color into the center of the petals. 
I stamped the images again with Ripe Persimmon Distress ink.  After the panel dried I stamped it again with VersaMark ink and embossed with clear embossing powder.  I repeated the process with the small daisy stamp.
For the background I found a piece in my stash that I created by applying green Pan Pastels to a piece of textured white cardstock.  I trimmed it to 4” x 5 ¼”, then stamped the sentiment in the lower right corner and embossed with clear embossing powder.  I fussy cut the daisies, then adhered them to the background.  I used foam adhesive on the back of the large daisy to give it extra dimension then adhered the piece to an A2 card.  I added a few sequins for some added sparkle.  You can also see my card on the Magenta blog here.

Thanks for visiting my blog today. 

Magenta Products Used

07.975.I - Happy Birthday

48.018.N _ Daisy - Large

48.018.K - Daisy - Small

Other Products Used

Pan Pastels

Distress Ink (Mustard Seed, Ripe Persimmon)

VersaMark Ink

Friday, March 11, 2022

Magenta Super Saturday - Spring Flowers

Welcome back to my blog and Magenta Super Saturday. Today’s card features a technique I haven’t used in a long time.  I used my Tombow marker to apply ink to the stamp, then stamping. You can also see my card on the Magenta blog here.

I started with a piece of white cardstock already cut to the finished size of 4” x 5 ¼”.  I positioned the Floral Burst stamp in my Misti, along with the Happy birthday sentiment. 

I began by coloring the flowers with an orange marker, then stamping.  I colored the stamp again with a darker orange and added shading with a red marker, then stamped again.  I repeated this process until the flowers were the color I wanted.  All of the colors I used are listed below. I followed the same process with the leaves and flower centers.  I stamped the sentiment using Pine Needles Distress ink. 
I cleaned the stamps thoroughly, re-inked with VersaMark, then stamped again.  I embossed with clear embossing powder which really makes the colors pop.  I used a blending brush to add a small amount of Antique Linen Distress ink around the outer edges. 
For the last step I masked the stamped images, then used Shabby Shutters Distress ink to stamp the Onion Stems stamp randomly in the background.  I adhered the panel to the front of an A2 card. 

Thanks for visiting my blog today. 

Magenta Products Used:

07.305.G - Happy Birthday

14.664.P - Floral Burst

14.677.K - Onion Stems

Other Products Used:

Distress Inks (Shabby Shutters, Antique Linen, Pine Needles)

Tombow Markers (925, Scarlet; 845, Carmine; 933, Orange; 025, Light Orange; 173, Willow Green; 195, Light Green; 277, Dark Green)

VersaMark Ink

Judikins Clear Embossing Powder

Friday, February 11, 2022

Embossing on Vellum

Welcome back to my blog and Magenta Super Saturday. I have a quick card for you today.  This started as a Valentine but I changed my mind about the sentiment and will be sending this card to my aunt who is recuperating from surgery. You can also see my card on the Magenta blog here.

I stamped the Flourishing Heart and Butterfly stamp on a piece of lightweight vellum paper (4 ¼” x 5 ½”) with VersaMark ink.  I used 24# vellum and it also has some little sprinkles of glitter on it which just adds to the background interest for the card. 

I added gold embossing powder and used my heat tool to slowly melt the powder.  The key to embossing vellum without warping the paper is to let your heat tool warm up for about thirty seconds then keep the tool moving back and forth across the image and switching to the front and back of the paper until the powder melts.  I stamped the Sending Hugs sentiment in the lower right corner and embossed it with gold embossing powder. 

I pulled some alcohol ink backgrounds from my stash to use under the vellum.  I cut the background to 4 ¼” x 5 ½” then adhered it to the front of an A2 card.   
I put a piece of 1/8” double sided tape on the left side of the vellum piece and then lined it up on the alcohol ink piece.  To hide the tape section of vellum I cut a strip of gold cardstock and adhered it to the left side of the vellum.  I added a few sequins and then on the backside of the vellum, I added small dots of glue to help hold the vellum in place.  You can also add a few drops of glue under some of the embossed areas. 

Thanks for visiting my blog today. 

Magenta Products Used:

07.971.F - Sending Hugs

40.345.N - Flourishing Heart and Butterfly

Other Products Used:

VersaMark Ink

Brutus Monroe Gilded Embossing Powder


Friday, January 14, 2022

Watercolor Thank You

Welcome back to my blog and Magenta Super Saturday. I hope your new year is off to a good start.  Today I have a project that was inspired by a Kristina Werner video which you can see here.  I decided to make a bunch of background pieces then use them to make “Thank You” cards.  You can also see my card on the Magenta blog here.

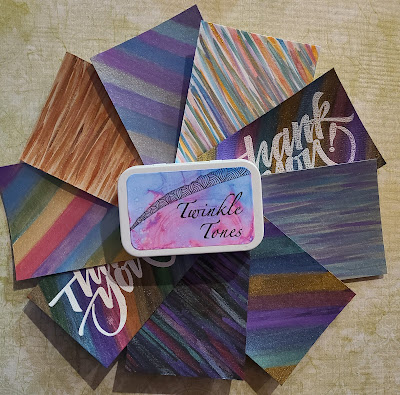
This technique doesn’t require a lot of water so instead of watercolor paper I used Strathmore Mixed Media paper in a variety of colors – White, Black, Toned Tan, and Toned Blue. I also used the Twinkle Tones watercolor paints that my friend Dianne Johnson and I made.  They have a lot of sparkle in them which adds a fun dimension to the cards.  You could use any other pearlescent watercolors such as those made by Finetec or Gansai Tambi. 

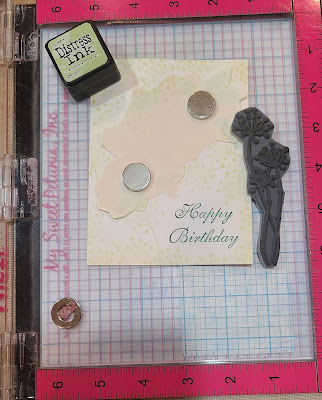
I used an eye dropper to add water to each of the watercolor pans that I was going to use.  I dipped my paintbrush in water then wiped off a good amount of it on a towel.  I picked up some paint on my brush and applied it to the paper in random brush strokes. 
I followed the same process with several different colors until the piece of cardstock was covered. 

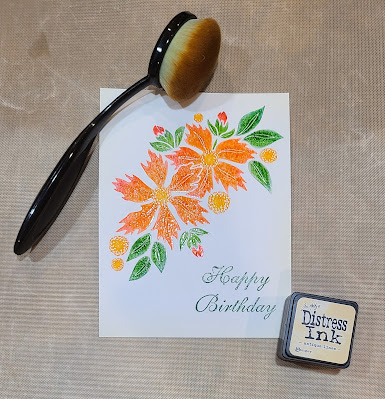
When the paint was dry I stamped “Happy Birthday” with VersaFine Black Onyx ink and embossed with Black Sparkle embossing powder.  I matted the piece of cardstock with some coordinating paper then adhered it to the front of a white, A2 card. 

I had so much fun with this technique that I created a bunch of card panels.  I experimented with a variety of cardstock colors, paint colors, brush sizes and painting in a variety of directions.
This is a close up of the completed piece and it really sparkles in the light.  If you are interested in learning more about making your own watercolors, you can see Dianne’s blogpost here. 

Thanks for visiting my blog today. 

Magenta Products Used:

07.978.N - Extra Large Thank You

Other Products Used:

Strathmore Mixed Media Paper (White, Black, Toned Tan, Toned Blue)

VersaFine Black Onyx Ink

Ranger Black Sparkle Embossing Powder