Tuesday, December 31, 2019

Happy New Year


Happy New Year!  Thanks for visiting my blog today.  My card is part of the Magenta Group New Year's post.  You can click here to see everyone's post on the Magenta blog.

This is a quick and easy card.  I cut a piece of white pearlized linen paper to 4" x 5 1/4" then, using my MISTI, positioned the two stamps on the paper.  I used my anti-static tool liberally on the front of the cardstock, then stamped both images using VersaMark ink.  I embossed with Brutus Monroe Gilded Gold embossing powder.  I masked off the images and then splattered some gold paint around the open area.

I wanted the background paper to match the embossed images so I applied VersaMark ink around the outer edges of a piece of 4 1/4" x 5 1/2" white cardstock, then covered with the same embossing powder.  I adhered this piece to the front of an A2 card, then adhered the stamped image over the top. I added a few accent jewels for some extra sparkle.

I wish you all the very best in the coming year.  Be sure to come back in the coming year for more posts.

Magenta Products Used:
0770.P Bursts


Other Products Used:
Brutus Monroe Gilded Gold Embossing Powder
Pearlized Linen Cardstock
VersaMark Ink

Tuesday, December 24, 2019

Merry Christmas


Merry Christmas!  My card today is part of a Magenta post from all the Design Team members.  You can check out all their beautiful Christmas cards here.  Magenta will also be doing a group post for New Year’s Day.

I love the “Penguin’s Gift” stamp.  I came across this one a few days ago while going through a box of stamps.  It’s one of my favorite Christmas stamps so I decided to share it with you today.  I bought this one so long ago that it was mounted on wood.  My first order of business was to remove the stamp from the wood block so I could use my MISTI.

I stamped the penguin in VersaFine Smokey Gray ink on white cardstock that was cut to 2 ¼” x 3 3/8”.  I also stamped the penguin again on a piece of scrap cardstock.  
I used Prismacolor pencils to color the penguin.  I also used a light gray pencil to add just a bit of “ground”, so it looks like the penguin is standing on something, rather than floating in the air - I did that after I took this picture but you can see it on the final card.  😊  Next, I colored the gift on the piece stamped on scrap paper.    I added some extra detail on the gift then went over the lines with a clear sparkly gel pen. (I’ve listed the Prismacolor pencils I used below.)  I cut out the gift and put foam tape on the back.

I returned the cardstock to my MISTI and stamped again with VersaMark and embossed with clear embossing powder.  I stamped the sentiment on a piece of white cardstock that was cut to 2 ¼” x 3 3/8” using VersaFine Smokey Gray ink.  After it dried, I stamped again with VersaMark and embossed with clear embossing powder.

I made a mask for my penguin and placed it over the top of the stamped image.  

Using blending brushes I lightly applied Tumbled Glass, Salty Ocean and Wilted Violet Distress inks to both images.  
The blending brushes make it easy to apply a very light amount of ink. 

To finish up the card, I removed the mask from the penguin and adhered the gift I had cut out over the top of the gift on the stamped image.  Next I mounted both images on a piece of So Silk Fashion Purple cardstock.  I adhered a piece of glittering cardstock to the front of an A2 card, then adhered both images to the card.  I used a T-ruler to line up both pieces.  I added a few sequins and then put a drop of Nuvo White Blizzard drops on the center of each sequin. 

Thanks for visiting my blog.  Be sure to check back on January 1st for another card.  Merry Christmas!


Magenta Products Used:
Penguin's Gift 37.195.I


Other Products Used:
VersaMark Ink
VersaFine Smokey Gray Ink
Judikins Clear Embossing Powder
Distress Inks (Tumbled Glass, Salty Ocean, Wilted Violet)
Prismacolor Pencils (PC1024 Slate Blue; PC1054 Warm Grey 50%; PC1001 Cool Grey 50%; PC936 Slate Grey; PC909 Grass Green; PC908 Dark Green; PC901 Blue Indigo; PC924 Crimson Red; PC921 Pale Vermillion; PC917 Orange)


Sunday, December 22, 2019

A Gnome Christmas

I love the new Gnome dies from Simon Says Stamp.  My friend Dianne Johnson loaned hers to me and I've made many of the Large Gnomes (SSSD112037) and the Lil Gnomes (SSD112101).  They make great additions to cards and they also make great gift tags.  Dianne Johnson has a great post on her blog using Mini Masterpieces and you can see her post here. The gnomes are so much fun.  You can mix and match their hats and coats.  I used velvet for some of them and ran their hats through a snowflake embossing folders.  The velvet embosses beautifully, but it didn't show up well in the photograph.  I used a Copic marker E11, Barely Beige for the nose, and C-0, Cool Gray around the outer edges of the beard.

I added the large gnomes to Christmas cards.  I applied Nuvo Glimmer paste through the Greetery's Frosty Flakes stencil onto a piece of white cardstock cut to 4" x 5 1/4".  I also used the Greetery's Drifting Dies two cut two layers of snow for the bottom of the card from white cardstock.  This die also embosses snow swirls into the paper.  I used a blending brush to apply a bit of Tumbled Glass Distress Ink to the edges of the snow layers then used my Wink of Stella clear glitter pen to accent those swirls.  I also stamped a Magenta Merry Christmas sentiment on the bottom of the front snow layer.

To assemble the card, I adhered a piece of silver matte cardstock to the front of and A2 card, then adhered the stenciled piece.  I adhered the "back" snow layer, then adhered the gnome and the front snow layer.  I added a few sequin snowflakes and added a drop of Nuvo White Blizzard in the center of each sequin.

For my second card I used a blending brush to add a small amount of Tumbled Glass Distress ink on a piece of white cardstock that had been cut to 4" x 5 1/4".  I just wanted a touch of blue as the background to snow.  I ran this piece through a Renke Snowflake embossing folder.  Using the Greetery's Drifting dies, I cut two drifts of snow then embossed them with snowflakes.  I also shaded them lightly with Tumbled Glass Distress Ink.  

Next I cut the "Merry Christmas" using Memory Box's Large Sentimental Merry Christmas (#99804).  I cut it twice with white cardstock and again with silver matte cardstock, then used Gina K. Connect glue to adhere all three layers together.

To assemble the card, I adhered a piece of silver matte cardstock to the front of an A2 card, then adhered the piece with the embossed snowflakes.  I attached the "back" snowdrift, then positioned and adhered the gnome, followed by the "front" snowdrift.  (I trimmed both of the snowdrifts until I had the right height.)  I adhered the sentiment and a few snowflake sequins.  I added a drop of Nuvo White Blizzard in the center of each snowflake.

These gnomes are so much fun and can be used for more than just Christmas.  Simon Says Stamp also has a stencil set (SSST121455) you can use to create gnomes or use with the dies.  

Products Used:
Simon Says Stamp Gnome Dies
SSD112101, SSD112037
The Greetery Frosty Flakes Stencil
The Greetery Drifting Die
Nuvo Glimmer Embossing Paste
Magenta Merry Christmas (07.779.G)
Memory Box Sentimental Merry Christmas (99804)
Gina K Connect Glue
Copic Markers
Distress Ink

Friday, December 6, 2019

Super Saturday with Pam – Wishing you Peace Love Joy


Welcome back to Super Saturday.  For today’s card I used the beautiful Flower Mandala Background.  You can also see my card on the Magenta blog here.

I centered the stamp over a piece of 100# black cardstock in my stamp positioner.  I used my powder tool very liberally all over the cardstock to prevent any stray bits of embossing powder from sticking in the background area.  I stamped the image using VersaMark ink then covered the image with gold embossing powder.  Before heat setting, I used a small paint brush to remove a few stray bits of embossing powder.
I used Gansai Tambi Gem Colors and Fine Tec Pearlescent metallic watercolor paints to fill in the images.  For each set I have made a color swatch for each color on a strip of black watercolor paper which helps me select the colors for my projects.  
Since I used cardstock rather than watercolor paper, I didn’t use very much water with the paints.  I put the cardstock on a Make Art Stay-Tion and held it in place with the magnets.  I used a shade of green for the center of the mandalas and a shade of blue green for the outer section of the manadalas.

After the paint was dry, I cut down the image to 4” x 5 ¼”.  Next, I centered the sentiment at the bottom of the image, stamped with VersaMark and embossed with gold embossing powder.  To add a bit of sparkle, I sprayed the image with Tsukineko Shimmer Spritz. To finish up the card, I adhered the image to a 4 ¼”x5 ½” piece of gold foil cardstock and then to the front of an A2 card.
I did a second card front using a shade of red and a shade of pink. I also think this would make a great card for other occasions such as birthdays and thinking of you cards.

Wishing you a joyous holiday season.  Thanks for visiting my blog today.  
Magenta Products Used
0772.R Flower Mandala Background

07.1019.F Wishing You Peace Love Joy
Other Products Used
Fine Tec Pearlescent Colours
Gansai Tambi Gem Watercolors
Gina K Black Onyx 100# cardstock
Wendy Vecchi Make Art Stay-Tion


Friday, November 8, 2019

Magenta Super Saturday - Sparkling Christmas Trees


Welcome back to Super Saturday.  I love this beautiful Christmas tree stamp from Magenta’s last release.  It has so many possibilities.  You can also see my card on the Magenta blog here.  
For today’s card, I stamped the tree in the center of a piece of matte metallic gold cardstock with VersaMark ink and then embossed with Judikins Pine Twinkle embossing powder. 
I filled the large circles of the tree with Nuvo drops in a variety of colors then set it aside to dry overnight.  
I used the Nuvo Jewel Drops and Nuvo Glitter drops because they are translucent, but you could also use Stickles or other products.  Alternatively, you could color the circles with Copic or TomBow markers then cover the circles with Glossy Accents.
While the tree was drying, I stamped the sentiment on the bottom pf a piece of textured white cardstock with VersaMark ink, then embossed with gold embossing powder.  I used a Die-namics Inside/Outside stitched rectangle die to cut a rectangle out of the cardstock and create a frame.  I covered the back of the frame with foam tape then centered it over the Christmas tree.  I adhered both pieces to a white A2 card. 
The embossing powder and mirror cardstock make this card sparkle and it’s hard to capture that in a photograph but here's a closer look.  


Here's the finished product.  I normally add extra bling to my cards but the card has so much sparkle already I decided to keep it simple this time. 

I also created two other cards.
I stamped one on light blue mirror card paper and used another one of Magenta's beautiful new sentiments. 

The third one was stamped on textured white cardstock. These cards are fast to put together.   Applying the Nuvo drops only takes about five minutes so you can easily several cards in a short time.
Thanks for visiting my blog today!

Magenta Products Used:
02.322.N Embellished Tree

07.1022.I Wishing You a Merry Christmas

07.1019.F Wishing You Peace, Love, Joy
Other Products Used:
Judikins Pine Twinkle Embossing Powder
Judikins Detail Gold Embossing Powder
Ranger Liquid Platinum Embossing Powder 
Nuvo Drops (Rosewater, Pale Periwinkle, Aquatic Mist, Limoncello, Blue Lagoon, Orange Marmalade, Key Lime, Strawberry Coulis, White Blizzard)
VersaMark Ink
MFT Die-Namics Inside/Outside Stitched Rectangle Die
Mirror Cardstock

Friday, October 18, 2019

Super Saturday - Autumn Leaves


Welcome back to Super Saturday.  Have you seen the Autumn and Christmas 2019 release from Magenta?  It is filled with so many great images that I had a hard time selecting something for today’s blog post.  You can see the full collection here.  For today’s card I used the medium and small Maple Leaf plus the “Autumn Paints Leaves” sentiment.  You can also see my card on the Magenta blog here.
I began by placing a 4 ¼” x 5 ½” piece of watercolor paper (smooth side up) in my MISTI.  Then I arranged each leaf stamp in the upper left corner, stamped with VersaMark, then embossed with gold embossing powder.  I returned the paper to my MISTI but flipped it around to stamp in the opposite corner and followed the same process.  I cleaned the stamps after each stamping.  
Next, I repositioned the stamps on my paper, stamped and embossed, then repeated the process until the entire piece of paper was covered.  
When I’m stamping repeatedly like this, I use the paper backing from the stamp to determine the stamp placement.  Just position the papers where you want your stamps, put the stamp on top of the paper then close the lid of your MISTI to pick up the stamps.  Remove the paper backing and stamp. 
I taped the watercolor paper to my work surface to keep it from curling while I painted.  I put bits of Tumbled Glass, Mermaid Lagoon and Chipped Sapphire Distress inks on my mat, then used a small paintbrush to fill in the background.  Initially I kept the background color very light.  
I let it dry, then followed the same process for the leaves using Wild Honey, Carved Pumpkin, Fired Brick and Candied Apple inks. 
When the leaves had dried I decided the background needed to be darker so I used the blue inks again but this time I used mostly Chipped Sapphire.  I think the darker background created a better contrast with the leaves. 
When the paper was dry, I removed the tape, then cut the piece down and adhered it to a piece of gold cardstock, then adhered that to a white A2 card.  I stamped the sentiment on a piece of white cardstock with VersaMark then embossed with gold embossing powder.  I used a bit of Chipped Sapphire ink around the edges.  I adhered the sentiment to a piece of gold cardstock, put some fun foam on the back so it would pop out a bit from the card.  Next I added a few gems for a bit more sparkle. 
I was having so much fun with this stamp that I created two additional cards.  I experimented with 
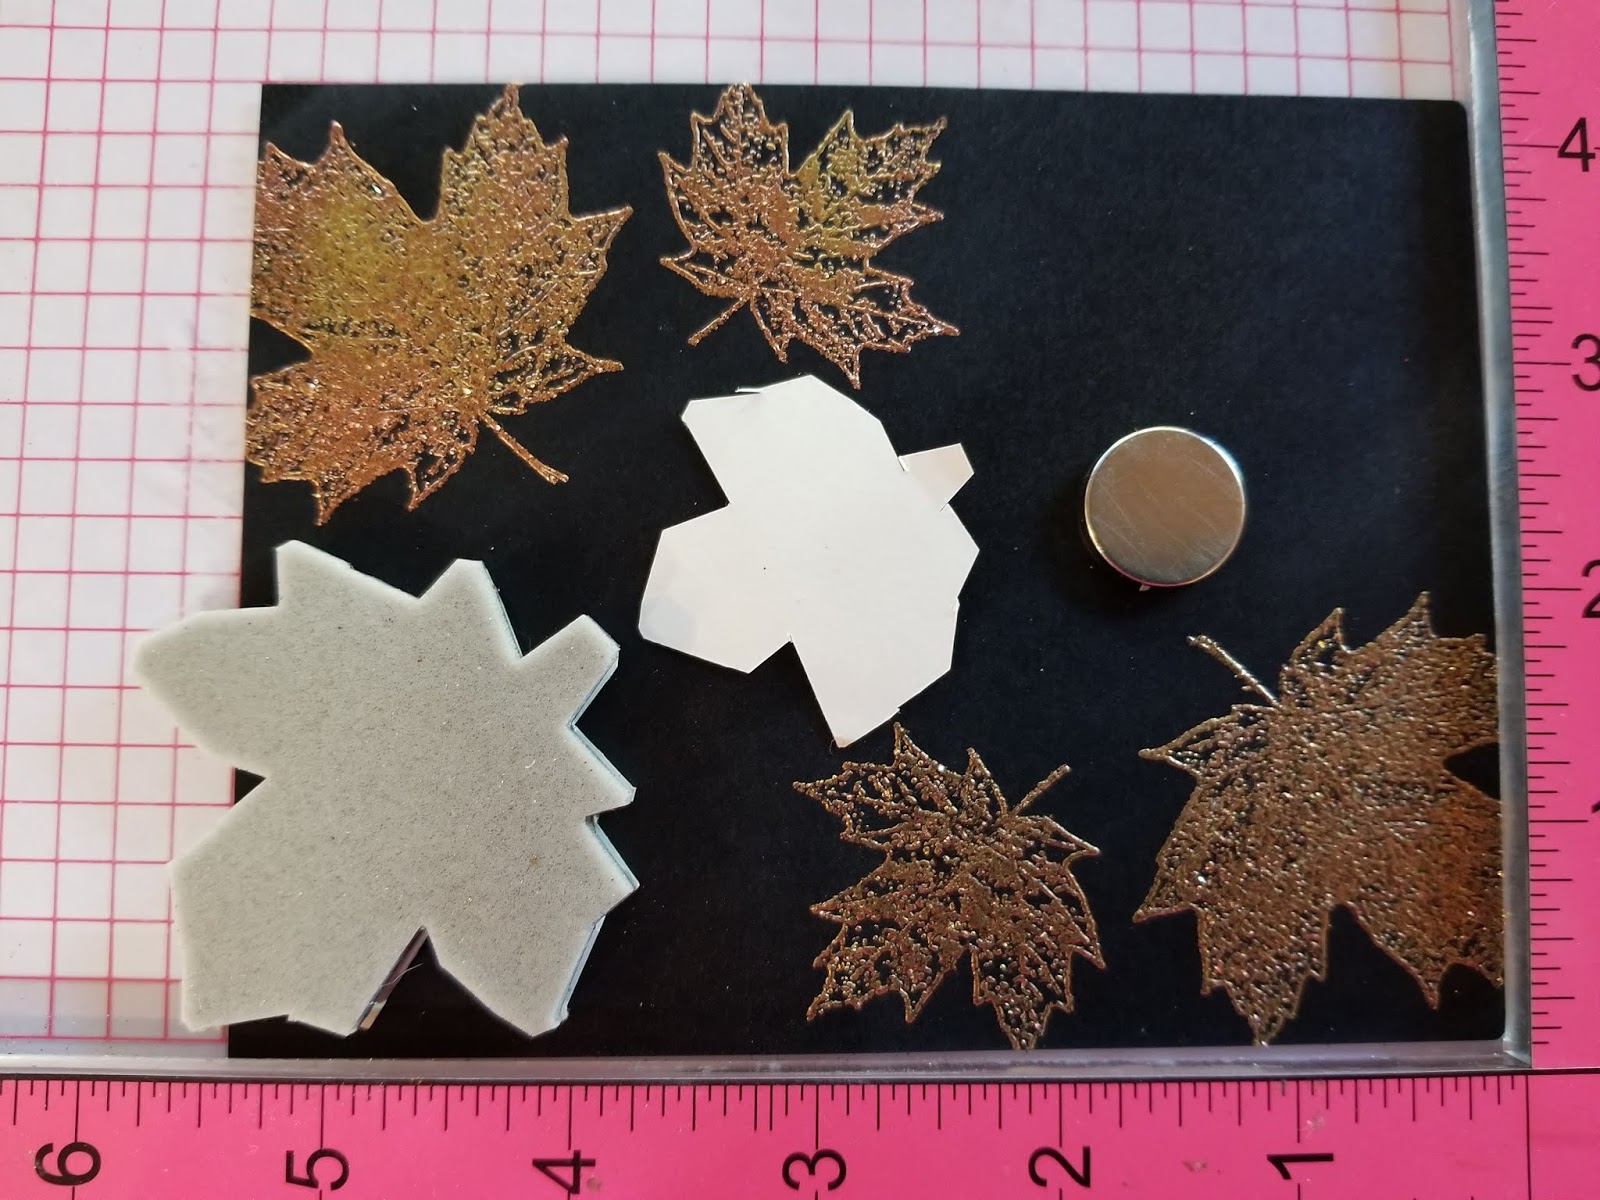
mixing different colors of metallic embossing powders together.  Each leaf has a different look because of the mixture of powders.  For these two cards I mixed copper, gold and rose copper embossing powders together.  The different colors show up a bit here but it was hard to capture with the camera.  It definitely shows up in person though.  
I stamped on rust color velvet paper for this card.  The embossing powder really sparkles on this velvet paper!  
For this card I used black So Silk paper which is a heavy cardstock with a bit of shine to it, but not as shiny as a metallic or mirror card paper.

I hope you will check out Magenta’s newest collection.  It is filled with so many beautiful stamps and stencils, to include lots of great images for your holiday cards, too.  (You can find the collection here.)  Just click on "Stamps" or  "Templates and Masks" to see all of the new items.  Thanks for visiting my blog today!

Magenta Products Used:
0801.J Maple Leaf Medium

0800.G Maple Leaf Small


Other Products Used:
Metallic Embossing Powders (Gold, Copper, Rose Gold)
Distress Inks (Tumbled Glass, Mermaid Lagoon, Chipped Sapphire, Wild Honey, Carved Pumpkin, Fired Brick, Candied Apple)
VersaMark Ink
Memory Box Stitched Rectangle Dies
Velvet Paper
So Silk Paper

Friday, September 20, 2019

Super Saturday with Pam - Thinking of You


Welcome back to Magenta Super Saturday.  I love this stamp from Magenta’s last release.  The bird sitting in the water seems to be perfect for a “thinking of you” card.  You can also see my card on the Magenta blog here.
I began by stamping the bird on a piece of 4 ¼” x 5 ½” Dura-Lar (a clear plastic type material) using Jet Black Stazon ink.  Since I stamped on plastic, I let this dry overnight to be sure I didn’t smudge the image.  I positioned the stamp to allow enough room for the sentiment at the bottom, however the sentiment is stamped on the background paper.
To create the background, I used Distress Stain daubers.  On a piece of watercolor paper, I applied Crushed Olive stain using a light back and forth motion on the paper.  Next I applied Salty Ocean stain, overlapping the Crushed Olive slightly to blend the two colors.  I used the stamped image as a guide because I wanted the reeds in the image to be in the green area as it transitioned to the blue water.  I moved to Tumbled Glass for the sky, again overlapping with the previous color. 
I added just a touch of Wilted Violet to the sky and blended it with the Tumbled Glass.  The violet is very subtle but you can see it on the finished piece.  When the piece of was very dry, I stamped the sentiment at the bottom using black ink and embossed with clear embossing powder so it would stand out a bit.
  
I trimmed the Dura-Lar piece and the watercolor piece to 3 ½” x 5 ½” inches, punched two holes in the top and tied them together with twine.  I adhered the panel to a piece of black cardstock.  I used a foam applicator to apply the corresponding Distress Inks on the front of the card to extend the color from the watercolor panel.  The inks are a bit lighter than the stains so I think they blended well with the stamped image.

This stamp is very versatile, too.  Christine Alexander recently used this stamp to create two beautiful cards.  She used alcohol inks on one card and Distress Oxide inks on the second card.  You can see her Magenta blog post here

Thank you so much for visiting my blog today!

Magenta Products Used:
0764.O Egret in Reeds

07.954.G Think of you often
Other Products Used:
Distress Stain Daubers (Crushed Olive, Salty Ocean, Tumbled Glass, Wilted Violet)
Distress Inks (Crushed Olive, Salty Ocean, Tumbled Glass, Wilted Violet)
Dura-Lar Clear Transparency
Stazon Jet Black Ink
VersaFine Black Onyx Ink

Friday, August 23, 2019

Super Saturday with Pam - Celebrating Friendship


Welcome back to Magenta Super Saturday.  For today’s card I’m celebrating the joys of friendship – I made this card for someone who has been my friend for many, many years.  You can also see today's card on the Magenta blog here.

I experimented with the Square Tile stencil, Nuance and Nuvo Glimmer embossing paste.  I used a die to cut a 4” square piece of white, mixed media paper.  Then I cut it in half diagonally.  Since I planned to use embossing paste on the paper, I decided to cut it in half before applying the paste, rather than after it dried.  I wasn’t sure if it would cut smoothly after the paste dried.)  
I taped the triangle to the back of the stencil then applied some sparkly embossing paste, removed the stencil and set it aside to dry.  I immediately washed the stenciling paste off the stencil.

After the paste dried, I tapped small amounts of aquamarine, turquoise and cerulean blue Nuance onto a craft sheet and sprayed lightly with water to create “paint”.  I spritzed the paper very lightly, then used a paint brush to pick up each of the colors and drop it onto the card, between the stenciled areas.  
I did this until the entire piece was covered. 
I ended up getting the color on the stenciled area, so I used a paper towel to blot off the excess color. 

Next I used Distress Oxide Sprays to create a background piece.  I sprayed Mermaid Lagoon, Broken China and Wilted Violet on another piece of mixed media paper.  I sprayed each color, added a bit of water and heat set.  
I sprayed another layer of color, dried and then added a third layer of color.  
I loved the final result and how the blues and purple blended together.  The color changes when I photograph it - the purples show through a lot in real life and you will see that on some of the other photos.

For the last step, I stamped the sentiment on a circle of cardstock.  I applied some Tumbled Glass Distress Ink around the edge to soften the bright white a bit.

I cut the Distress Oxide piece to 4” x 5 ¼” and the attached the stenciled triangle.  I trimmed the ends of the triangle even with the sides of the cardstock, then adhered to a piece of Glamour Green cardstock and then adhered it to an A2 card.  I adhered a piece of fun foam to the back of the sentiment circle, then adhered to the front of the card.  I added a few gems for a bit more sparkle.

By the way, this sentiment comes in two additional versions – Circle of Friends 1 which you can find here and Circle of Friends 2 which you can find here

Thank you so much for visiting my blog today!


Magenta Products Used:
TM302 - Square Tile
Nuance


Other Products Used:
Nuvo Glimmer Paste
Distress Oxide Sprays (Mermaid Lagoon, Broken China, Wilted Violet)
Distress Ink (Tumbled Glass)