Showing posts with label Brutus Monroe Gilded Gold. Show all posts

Friday, November 12, 2021

Sparkling Autumn Birthday

Welcome back to my blog and Magenta Super Saturday. Today I used my sparkly Iuile watercolor paints to create a fall themed birthday card.  You can see my card on the Magenta blog here.  I love the sparkle from the Iuile’s paints.  Kristina Werner uses them frequently on her blog posts.  My card was inspired by one of her videos which you can see here.

I stamped the large Acacia branch repeatedly on a piece of Stonehenge black watercolor paper that was cut to 2” wide by 5 ½”.  I have found that this paper cuts best with a guillotine cutter.   Before stamping I generously used my powder tool over the surface of the paper, stamped with VersaMark ink, then embossed with gold embossing powder. 

I painted the leaves using a variety of fall colors – gold, orange, red and green, from Iuile's Christmas set and Shiny Series.  All of these paints are so beautiful but they are especially beautiful when used on dark paper.  For a bit more sparkle I lightly splattered gold watercolor on top. When the water-colored piece was dry, I adhered it to a piece of gold metallic paper that was cut to 2 ¼” x 5 ½”. 
I created an A2 card with Kraft cardstock, then stamped the acacia branch repeatedly on the right side of the card with VersaMark ink then dried the ink with my heat gun. 
I stamped the vertical happy birthday stamp on the right side of the card, then embossed it with gold embossing powder.  I applied Tea Die Distress Oxide ink around the outer edges of the card, followed by Crackling Campfire then splattered a bit more gold watercolor paint for a bit more sparkle.  To complete the card, I adhered the water-colored strip to the left side of the card.

Thanks for visiting my blog today. 

Magenta Products Used:

07.430.I - Happy Birthday

0817.M - Acacia Branch Large

Other Products Used:

Iuile Watercolors (available from Etsy.com)

Stonehenge Aqua Coldpress Black Watercolor paper

Distress Oxide Ink (Tea Dye, Crackling Campfire)

VersaMark Ink

Brutus Monroe Gilded Gold Embossing Powder


Friday, September 3, 2021

Magenta Super Saturday - New Stamps!

Welcome back to Super Saturday.  Today I am using the beautiful bird stamp from Magenta’s most recent release of new stamps. You can also see my card on the Magenta blog here.

I used water-based TomBow markers to color the image on the back of vellum – I just love this technique. You can also used alcohol based markers (Copic) or colored pencils - each medium provides a beautiful result.  I cut a piece of 29# vellum to 4 ¼” x 5 ½”.  I used my powder tool very liberally over the surface, stamped the bird image using VersaMark, then sprinkled Brutus Monroe Gilded Gold embossing powder over the top.  To heat emboss the image I warmed up my heat gun for about 30 seconds then kept it moving over the entire surface of the paper to slowly melt the embossing powder without warping the vellum. 

I selected several green markers and began coloring the leaves on the back side of the stamped image.  It takes a bit longer for the ink to dry on the vellum which provides more time for blending the colors.  I've listed all the colors I used below.

Once I completed the leaves I moved on to the bird, berries, and the fence posts. 
I wanted a colored background for the bird and at first I thought about coloring in that area on the vellum.  Instead, I blended Tumbled Glass and Mermaid Lagoon Distress Oxide inks onto a piece of white cardstock, putting the lighter color in the center, and the darker color around the outer edges.  This will go under the vellum layer to create blue shading.  
I used 4 3/8” and 4 5/8” oval dies from the Hero Arts Infinity Dies to create a frame for the bird.  To create this look, I cut a piece of white cardstock and green cardstock to 4 ¼” x 5 ½”.  I used the 4 5/8” oval die to cut the opening in the white cardstock, then adhered this to the green cardstock.  I centered the smaller oval die in the opening, taped it down and ran it through my die cut machine. 
Next, I adhered the bird, embossed side up, to the back of the frame, adhered this to the inked blue background and finally adhered them to the front of an A2 card. 

Magenta Products Used:
0827
The new stamps aren't available in the store yet so to order them, please e-mail Magenta and provide the stamp number.

Other Products Used:
Brutus Monroe Gilded Gold embossing powder
TomBow Markers ((Leaves: 245, 346, 195); (Bird: 25, 885, 905, 847): (Berries: 847, 565); (Fence 899, 977))
Distress Oxide Ink (Tumbled Glass, Mermaid Lagoon)
VersaMark
Hero Arts Infinity Dies - Nested Oval 


Friday, August 6, 2021

Magenta Super Saturday - Rainbow Greetings


Welcome back to my blog and Magenta Super Saturday.  Today I have a card that can be made very quickly.  It was inspired by a Kristina Werner video which you can see here.  I used Karin Watercolor markers, but I also think other water-based markers like Tombow or Zig would work well. You can also see my card on the Magenta blog here.  

To begin, I used VersaMark ink to stamp the greeting on a panel of watercolor paper that measured 5 ½” x 4 ¼”.  I embossed the stamped image with Brutus Monroe Gilded gold embossing powder, then taped the panel to my glass mat to prevent it from curling. 
I selected several markers in bright colors.  The colors I used are listed below. 
I colored diagonal stripes in rainbow order across the watercolor panel, leaving a small open space between each color to allow for blending.  To blend the colors, I dipped a 1/2” brush in water, then blotted it off on a towel. 
I started in the upper left corner and brushed over the green and blended it into the yellow.  I rinsed my brush, blotted off the excess water, then painted over the yellow and blended it into the orange. You can always pick up a tiny bit more water on your brush to help the blending process.  If you get too much water on your panel you can always dab it off with a paper towel.  I followed this process with each color, then let the panel dry.  You can also use a heat gun to try the panel if you prefer.
I decided I wanted to make the colors a bit more vibrant, so I added a second layer of color using the same process as above.  You don’t need very much water for the colors to blend.
When the panel was dry, I removed the tape, then used a die to cut the panel to 3 ¾” x 5”.  I also used the same die to cut two pieces of 65# white cardstock to the same size.  I adhered all the pieces together, then adhered them to the front of a white A2 card.  The extra white panels raise the painted image off the card and create a bit of dimension.  I added a few sparkly gems, and the card was complete.
I decided to make some thank you cards and followed the same process except I embossed with Brutus Monroe Alabaster white embossing powder.  The finished card is an A1 or announcement size card – the folded size is 3 ½” x 5”.  It would be easy to make several of these cards at once to have on hand or to make a set of cards to give as a gift. Thanks for visiting my blog today. 

Magenta Items used:

07.999.N - Happy Birthday

07.979.G - Thank You

Other Items Used:

Karin Brushmarker Pro (Grass, Canary, Amber, Magenta Red, Violet Blue, Royal Blue)

VersaMark Ink

Brutus Monroe Gilded Gold Embossing Powder

Brutus Monroe Alabaster Embossing Powder


Friday, July 9, 2021


Welcome back to my blog and Magenta Super Saturday.  Today I have a card that is very quick and easy which you can also see on the Magenta blog here. 

I pulled a piece of background paper from my stash.  This particular piece was made using shaving cream and Nuance.  You can see my post on how to make the paper here. 

I selected this piece because I liked the swirl design and I thought it would work well with the Dandelion Trio stamp.  I cut the background paper to 4 ¼” x 5 ½” and adhered it to the front of an A2 card.  You can certainly use any paper, or scrapbook paper; just experiment by holding your vellum over the background paper to see which one you like the best. 
I cut a piece of medium weight vellum to 4 ¼” x 5 ½” and liberally used my powder tool over the entire surface then placed it in my stamp positioner.  The Dandelion Trio stamp is a two-piece set and I positioned the piece with two dandelions on the left side of the vellum.  I positioned the sentiment on the right side of the vellum and stamped both images at the same time with VersaMark ink.  I embossed with Brutus Monroe Gilded Gold embossing powder.  When embossing on vellum it is important to pre-heat your embossing tool and to keep it moving over the surface of the paper to keep the paper from warping or melting while the embossing powder melts.
I applied VersaMark ink around all four sides of the stamped image and then embossed with more gold embossing powder.  You can do this step multiple times until you have the amount of gold around the edges that you like.

On the back of the vellum, I applied small drops of glue under the gold and under parts of the stamped image.  By putting the glue under the gold embossing powder, it won’t show through to the front of the vellum.  I adhered the vellum to the front of the card and then put a book on top of the card to weigh down the vellum until the glue dried.  For the final step I added a few gold gems. 

Thanks for visiting my blog today. 

Magenta Products Used:

07.817.H - May the Love

0762.P - Dandelion Trio
MNUC - Nuance
Other Products Used:
Brutus Monroe Gilded Gold Embossing Powder
VersaMark Ink

Friday, September 4, 2020

Magenta Super Saturday - Mandala Slimline Card

Welcome back to Magenta Super Saturday and thank you for visiting my blog.  Slimline cards are 
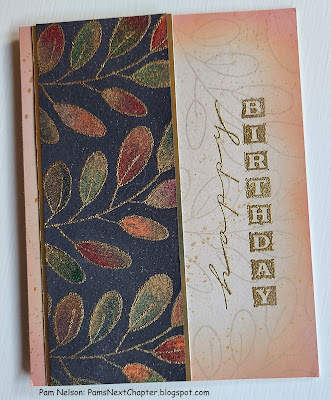
really popular right now so I decided to make one for today’s post.  I used the Flower Mandala Background stamp and my stamp positioner.  I planned to stamp, then color with colored pencils, then re-stamp the image and emboss with gold embossing powder.  You can also see my card on the Magenta blog here

To make the layout for this card work, I had to do some math and some experimenting.  Since I wanted the stamped design to be centered I realized that I needed to cut the cardstock for the stamped image the same width as the stamp.  To begin, I cut a piece of 80# white cardstock to measure 4 ½” x 10 ¼”.  (This is the width of the stamp and twice the length of the stamp.)  


I blended Squeezed Lemonade, Spun Sugar and Dried Marigold Distress inks over the entire piece.  I also blended these same inks on a scrap of cardstock to use later for the sentiment.  

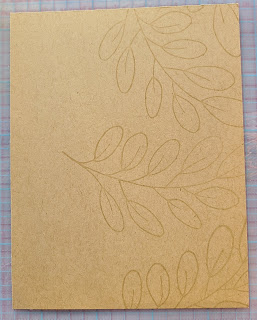
After the inks had dried, I placed the cardstock in the corner of my stamp positioner and stamped with VersaFine Toffee ink.  I rotated the paper and stamped the image again.  The bottom edges of the stamped images will almost touch in the middle of the piece of cardstock.

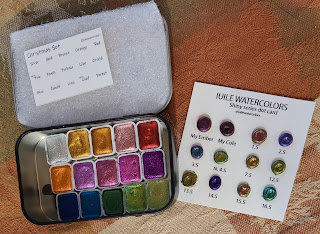
I colored all the mandalas with colored pencils (the colors I used are listed below), then returned the cardstock to my stamp positioner.  I used a powder tool over the entire piece, stamped with VersaMark, then embossed with Brutus Monroe Gilded Gold embossing powder.  I also stamped the thank you sentiment, embossed with gold embossing powder and cut it out with a 2” circle die.

To assemble the card, I began with the card base.  The final size of the card is 4” x 9”.  I cut the base cardstock to 8” x 9”, then scored and folded in half.  I cut a piece of orange cardstock to 3 ¾” x 8 ¾” and also cut a 2 ¼” circle for the backing of the sentiment.  The final size of the mandala piece is 3 ½” x 8 ½”, however, in order for the design to remain centered I cut equal amounts from each side of the piece.  I cut ½” from each long size and 7/8” from each end.  After assembling I added a few sequins for a bit of sparkle. 

Here are the final measurements:

Base card:  8"x9", scored and folded in half at 4" to make a card that measures 4" x 9"; Matting cardstock: 3 3/4" x 8 3/4"; Stamped image:  Original size was 4 1/2" x 1- 1/4", then cut to 3 1/2" x 8 1/2".

One note, I used 110# cardstock for my card base but this made the card weigh more than one ounce which increases the postage when you mail the card.  Using 80# cardstock will decrease the weight and should keep it under one ounce. 

If your stamp positioner can’t accommodate a longer piece of cardstock, you can skip the second stamping step.  


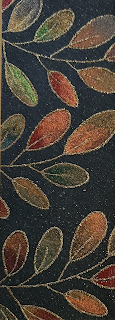
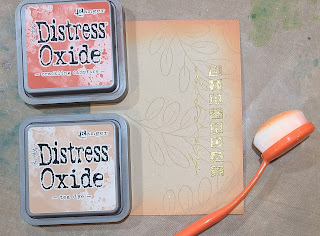
I also created some other panels with Distress inks and Distress Oxide inks.  Going left to right on the picture above I used I used Distress Oxide in Peacock Feathers, Evergreen Bough and Twisted Citron. When the ink was dry, I stamped and embossed with gold embossing powder, then used a Wink of Stella pen to color the mandalas for a bit of sparkle.  For the next panel I used Distress Shaded Lilac and Tumbled glass then colored with pencils (the colors are listed below) and embossed with gold embossing powder.  The middle panel is the one I used for today's card.  For the fourth panel I stamped my image, then used small blending brushes to shade the mandalas with Distress Oxide Picked Raspberry and Wilted Violet, then colored the open areas with Spun Sugar. When the ink was dry I restamped the image and embossed with gold embossing powder.  On the last panel, I blended Distress Oxide Twisted Citron, Evergreen Bough and Lucky Clover inks over the entire panel and when the ink was dry, I stamped and embossed with gold embossing powder.  I again used a clear Wink of Stella pen to apply sparkle on the Mandalas.  

This was a fun project and I ended up with several panels for more slimline cards.  I hope you will give it a try. Thanks for visiting my blog today.  

Magenta Products Used

0772.R
07.979.G


Other Products Used

Prismacolor Pencils (Panel 1: Carmine Red PC926; Yellowed Orange PC1002; Pale Vermillion PC921; Crimson Red PC924; Permanent Red PC122; Spanish Orange PC1003) (Panel 2: China Blue PC1100; Lilac PC956; True Blue PC903; Violet Blue PC933; Imperial Violet PC1007; Peacock Blue PC1027)

Distress Inks

Distress Oxide Inks

VersaMark Ink

Brutus Monroe Gilded Gold Embossing Powder

Wink of Stella

Friday, August 7, 2020

Magenta Super Saturday - Fun with Puzzle Stamps


Welcome back Magenta Super Saturday.  Thanks for visiting my blog.  For today’s card I used a Magenta puzzle stamp set that I’ve had for at least 13 years, and probably longer. 
I love these puzzle sets because you can arrange the stamps in a variety of ways and now that we have stamp positioners, it’s even easier to make beautiful compositions with these stamp sets.  You can see my card on the Magenta blog here.
I began by arranging the stamps in my stamp positioner.  I needed to make some “Thank You” cards so I decided to incorporate a sentiment into the design.  I used the small “Thank You” that Sally Penley designed for Magenta because the size and scale worked perfectly with the other stamps in this set.  I experimented with a few different arrangements and stamped on some scratch paper until I had the arrangement I liked.  I stamped the image on a piece of white cardstock and then colored all the floral images with my Caran D’ache Luminance colored pencils.  
When I was done coloring the flower images, I used a T-ruler and a pencil to draw a rectangle around the thank you greeting, similar to the line that is around the flower puzzle stamps, then colored in the area around the greeting.  I put the image back in the stamp positioner, restamped with VersaMark and embossed with Brutus Monroe Gilded gold embossing powder.   I drew over the pencil line around the greeting with a fine tip glue pen and also added a few dots of glue around the greeting, then covered that with gold embossing powder.  When the glue was dry, I heat set the embossing powder. To finish up, I trimmed down the image then adhered it to a slightly larger piece of gold foil cardstock, then adhered that to the front of an A2 card. 
Just for fun, I’ve added another picture of a card (and I apologize for the photo quality) that I made for my daughter-in-law’s first Mother’s Day thirteen years ago.  I used this same stamp set and added my adorable granddaughter’s picture to the design. 
Magenta has several puzzle stamps and they all begin with the code “CSET”.  You can see more puzzle stamps here.  Thanks for visiting my blog today!

Magenta Products Used:

CSET23 - Spring Passion
07.977.E - Thank you Small
Other Products Used:
Caran D'ache Luminance Colored Pencils
VersaMark Ink
Brutus Monroe Gilded Gold Embossing Powder


Tuesday, July 28, 2020

Shaving Cream Background Papers

Thanks for visiting my blog today.  I'm doing a special Wednesday post for Magenta today which you can also see here.

My grandson who will soon be twelve, recently took an on-line video editing class.  We started a YouTube channel called "Lady and the Stamp."  Isn't that a great name for a grandmother who loves to stamp?  We just posted our first video which features Magenta Nuance along with “Happy Birthday” and “Thank You” stamps. I've also seen this technique done with acrylic paints and ink refills, plus I think you could also use food coloring.  Magenta's Nuance colors are so versatile and there is such a wide variety of colors that I thought it would be fun to try it with this technique.  You can see the entire process in the video below.  If the video link doesn't work you can also see it here
You simply spray shaving cream onto a cookie sheet or other flat surface, sprinkle Nuance over the top, spritz with a bit of water and let it sit for a few minutes.  Then you run pieces of cardstock through the color to create a beautiful marbled effect on the paper. 
These papers make great background pieces.  It’s a very fun technique so I hope that you will give it a try and then let us know what you think.

Magenta Products Used: 

MNUC

07.975.I
07.978.N
Other Products Used
Neenah 110# Solar White Cardstock
Barbasol Shaving Cream
VersaFine Ink - Blue Lagoon
VersaMark Ink
Judikins Iridescent Sparkle Embossing Powder (for the Happy Birthday and small Thank you cards)
Brutus Monroe Gilded Embossing Powder (for the large Thank you Card)