Showing posts with label So Silk cardstock. Show all posts

Friday, May 1, 2020

Magenta Super Saturday - Bluebird of Happiness


Welcome back to Magenta Super Saturday.  I hope you are all healthy and staying safe.   

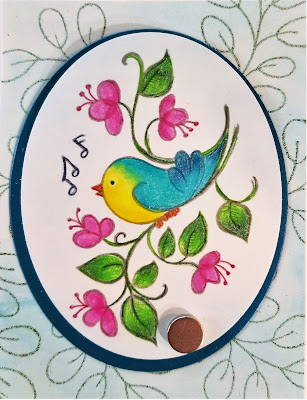
I love the new “Warbler Spring” stamp from Magenta’s new collection. It just feels so happy and we can all use some happy right now.  You can also see my card on the Magenta blog here.
To create this card, I started by taping two pieces of white, 140# hot press watercolor paper to a board. I applied water to the entire surface with a large brush then added a bit of Viridian and Turquoise Blue watercolor paint from my new Elizabeth Craft watercolor set (I absolutely love these new watercolors!)  I wanted the color to be very subtle, so I moved it around on the paper until I was happy with the intensity.  
On one piece I tried to keep the center lighter since that is where the bird would be stamped.
When the paper was dry, I put the piece with the lighter center in my stamp positioner and stamped the bird image using Hero Arts Soft Granite ink.  I colored the image with colored pencils. The hot press watercolor paper has a very smooth texture, so the coloring was very easy. I used my anti-static powder tool all over the image then returned the piece to my stamp positioner.  I re-stamped with VersaMark ink then embossed with clear embossing powder. I cut out the bird image with the 4 ¼” oval die from the Hero Arts Nested Oval die set then used the 4 3/8” die from the same set to cut a second oval from a piece Glamour Green So Silk cardstock.
I cut the second piece of watercolor paper to 4” x 5 ¼” then used a ruler to determine the center of the card and marked the center with a pencil.  I used the pencil mark as a reference point for the leaf stamp by aligning the stem of the acacia leaf with the pencil mark.  I stamped with VersaMark ink repeatedly around the card.  
After stamping the image a few times, I embossed with Ranger Verdigris embossing powder, then stamped a few more times and embossed again until I worked my way all around the card.  

When I finished the embossing, I wasn’t sure whether I wanted to color the leaves but ultimately decided to just lightly color them. 
I adhered the leaf piece to the front of an A2 card. Next, I adhered the two ovals together and before assembling I adhered an oval piece of fun foam to the back for a bit of dimension, then adhered to the top of the leaf piece.  I added a few light-colored sequins to reflect the light.
Thanks for visiting the blog today. Be sure to check out Magenta’s most recent release. You can see all the beautiful new stamps here and all the great stencils and masks here.

Magenta Products Used
40.348.N - Spring Warbler

0818.J - Acacia Branch Small
Other Products Used
Elizabeth Craft Watercolors
Ranger Verdigris Embossing Powder
Judikins Clear Embossing Powder
VersaMark Ink
Hero Arts Soft Granite Dye Ink
Prismacolor Pencils
So Silk Cardstock


Sunday, April 26, 2020

Hope


Welcome back to Magenta Super Saturday.  I hope you are all healthy and staying safe.  

In my card today I have used several stamps from Magenta’s newest release.  The sentiment stamp is an older one but I have always loved its message of hope and really think we can all use this message during these uncertain times.  You can also see my card over on the Magenta blog here.

For the card layout I wanted to arrange several images in a grouping, so I began by putting a piece of scrap paper in my stamp positioner.  I arranged the stamps and then stamped on the scrap paper to make sure I liked the arrangement.  Then I rearranged the stamps to cover the rest of the area.  I tried several different arrangements until I was happy with the pattern.  
  
Next, I put a piece of white cardstock in my stamp positioner and put the final scrap paper version on top.
I arranged the stamps for the first stamping using the scrap paper as a pattern. I removed the scrap paper and stamped a piece of 4 1/4" x 5 1/2" cardstock with VersaFine Olympia Green ink.  
I colored the images with Prismacolor pencils then returned the cardstock to my stamp positioner.  I restamped with VersaMark and embossed with clear embossing powder. 
When the embossed image had cooled, I returned it to my stamp positioner, put the scrap paper back on top, then arranged the stamps over the other section.  I followed the same process – ink, color, re-stamp and emboss over the second section. I adhered the panel to the front of an A2 card.
I splattered watercolor paints on another piece of white cardstock and let it dry.  Then I cut two strips - one to 5/8" x 5 1/2" and the other to 1 1/2" x 5 1/2". I stamped the sentiment on the larger piece with VersaFine Black Onyx ink and embossed with clear embossing powder.  
Next, I cut two strips of So Silk Beauty Pink cardstock.  One measured 3/4" x 5 1/2" and the second piece measured 1 5/8" x 5 1/2".  I adhered the smaller strip along the top of the card and the wider strip across the bottom of the card.  I adhered the white strips on top of the pink strips so that just the edge of the pink along the stamped images showed.
These stamps are just a few of the beautiful new stamps you can find in Magenta’s newest release.  You can see all the new stamps here and the new stencils and masks here.  Thanks for visiting my blog today. 
Magenta Products Used:
0814.G - Daisy Star Small

0816.G - Daisy Painted Small

0818.J Acacia Branch Small

0821.E - English Garden

07.513.I - Hope

Other Products Used:
VersaFine (Olympia Green, Onyx Black)
VersaMark
Judikins Clear Embossing Powder
Prismacolor Pencils
So Silk Cardstock

Wednesday, July 11, 2018

Getting started...

Well folks, I finally did it, I've finally started my own blog.  This site will be "under construction" for a while so I hope you will bear with me as I continue to tweak the layout and content.  I'm really looking forward to "sharing art" with you.

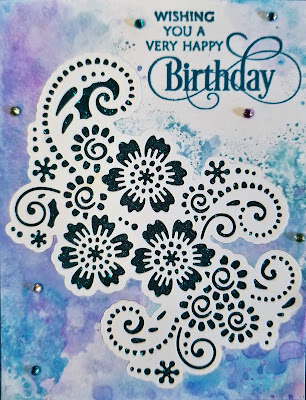
Today I'm sharing a card using a beautiful Elizabeth Craft die and Elizabeth Craft Microfine Glitter.  I recently had the opportunity to work in the Elizabeth Craft booth at the Puyallup Stamp and Scrapbook Expo where I got to see their beautiful dies, stamps, and new glitter colors plus lots of amazing sample cards that featured their products.  This particular video from Elizabeth Craft inspired my cards:  https://www.youtube.com/watch?v=HzGWhAsed_g


The great thing about this technique is that you end up with two cards.  To get started, I used VersaFine Clair Warm Breeze Ink to stamp a sentiment from the Penny Black Special Thoughts (30-338) stamp set, in the upper right corner of a panel of white cardstock cut to 5 1/4" x 4".  I embossed the sentiment with Judikins Clear Embossing Powder.  (I love the new VersaFine Clair inks!  They colors are amazing and they also work great with embossing powders.  I plan to be doing lots more with these inks.)

Next I applied Distress Oxide inks (Mermaid Lagoon, Broken China and Wilted Violet) to a craft mat and sprayed it lightly with water.  I cut a mask for the sentiment from a sticky note and placed it over the sentiment on the card panel.  I dabbed the panel into the Oxide ink, working around the sentiment, then dried it with a heat gun.  I repeated this process two more times until I got the depth of color I wanted.

I die cut the panel with the Elizabeth Craft Flower Lace 2 die.  I also die cut a second piece from a panel of white cardstock that had been cut to 5 1/4" X 4".  This gives you two die cuts and two open panels.  To the back of the Oxide Ink panel, I applied a piece of Elizabeth Craft double sided adhesive, cut slightly smaller than the panel.  I turned it over, sticky side up and pieced in the white die cut, pressing it into the adhesive firmly.  Then I put the panel on a coffee filter and sprinkled Elizabeth Craft Blue Streak MicroFine glitter over the panel.  Tap off the excess glitter and burnish it with your finger.  The more you burnish the glitter, the more it will shine.  Wipe off the panel with a microfiber cloth.

To finish the card, I adhered the panel to a piece of Glamour Green So Silk cardstock and then adhered it to an A2 size card.  I added a few gems for accents.


For the second card, I followed the steps above and pieced the Oxide ink die cut into the white cardstock panel.  I used Elizabeth Craft Amethyst Microfine glitter and in addition to gems, I also used the swirls from the die cut for additional accents.

Products I used:

Elizabeth Craft Flower Lace 2, #1383
Elizabeth Craft Microfine Glitter (Blue Streak, Amethyst)
Penny Black Special Thoughts, #30-338
Distress Oxide Ink (Mermaid Lagoon, Broken China, Wilted Violet)
VersaFine Clair Ink, (Warm Breeze)
Judikins Clear Embossing Powder
So Silk Cardstock

I really loved how easily these dies cut through the cardstock.  It would be easy to make several of these cards, with or without a sentiment.

Thank you so much for visiting my blog.  I hope you will visit again.