Showing posts with label Prismacolor Pencils. Show all posts

Friday, April 22, 2022

Magenta Super Saturday - Hope

Welcome back to my blog and Magenta Super Saturday.  

For today’s card I stamped the Spring Warbler on a piece of white cardstock, then colored with Prismacolor pencils. You can also see my card on the Magenta blog here

I restamped with VersaMark ink and embossed with gold embossing powder.  I die cut the image using the Sizzix Stacked Archway dies, then used Salty Ocean Distress ink to shade the edges of the die cut.  I also cut two more die cuts and glued all three pieces together. 
For the background piece I applied Ripe Persimmon Distress ink through the Tumbled Leaves stencil onto a piece of watercolor paper that I had previously colored with Nuance powders.  I stamped the sentiment on a piece of white cardstock and embossed with gold embossing powder.  I trimmed it to 3 7/8” x 1 ¼” and also cut two more strips the same size.  I adhered all three pieces together.  I adhered the background to a white, A2, then adhered the stamped image and the sentiment.  I added a few sequins for some sparkle.   

Thanks for visiting my blog today.

Magenta Products Used:

40.348.N - Spring Warbler

07.513.I - Hope


TM321 - Tumbling Leaves Duo

Other Products Used:

Prismacolor Pencils

Sizzix Tim Holtz Stacked Archway Dies

Friday, September 24, 2021

Magenta Super Saturday - O Christmas Tree!

Welcome back to my blog and Magenta Super Saturday.  Today I am using the new Christmas tree stamp from Magenta’s 2021 Holiday release.  You can also see my card on the Magenta blog here

I placed the stamp in my stamp positioner, stamped with VersaFine Black Onyx ink on a piece of white cardstock, then used Prismacolor colored pencils to color the image.  I returned the stamp to my stamp positioner, stamped with VersaMark ink, and embossed with Judikins Pine Twinkle embossing powder.  I shaded the outer edges around the tree with Distress Tumbled Glass Oxide ink. 
To create the frame, I cut a piece of red linen cardstock and two pieces of 65# white cardstock to 4” x 5 ¼”.  I stacked all three pieces together and cut them with the Penny Black Stitched Frames frame die.  This process ensures all three pieces are cut in the same position.  If the die doesn’t cut through all three pieces of cardstock, lift off the cut layer then just fit the die back into imprint on the next layer, and die cut again.  Glue all three layers together then trim down the stamped image to fit behind the frame.  Glue the frame to the stamped image, then to the front of an A2 card.  To finish I added some Nuvo White Blizzard glitter drops in the background for a bit more sparkle.

Magenta Products Used:


Other Products Used:
VersaFine Black Onyx Ink
VersaMark Ink
Judikins Pine Twinkle Embossing Powder
Penny Black Stitched Frames die set (#51-709)
Nuvo White Blizzard Glitter Drops
PrismaColor Pencils
Distress Oxide Tumble Glass Ink


Friday, January 1, 2021

Magenta Super Super Saturday - Happy New Year


Welcome back to my blog.  I hope your New Year is off to a great start.  

I decided to make a set of tri-fold cards today using a set of Magenta puzzle stamps.  The Garden Flower Tile set has four different square stamps that work together beautifully but can also be used individually.  These cards will work well for any occasion but I plan to send them to friends just to say “hello.”  You can also my cards on the Magenta page here.

I positioned each of the stamps in my stamping tool and stamped them on a piece of desert storm cardstock with VersaFine Olympia Green ink.  I lined them up so there would be enough space to cut them out after I finished coloring them. 

Next, I colored the images with Prismacolor pencils (There’s a list of the colors I used below.)   I used my powder tool generously over all the images and returned the piece to my stamp positioner.  I restamped the images using VersaMark ink and then embossed with clear embossing powder.  I cut out all the images which created a 2” square.  Then I matted them on two slightly larger squares of cardstock. The first layers was a piece of embossed velvet that measured 2 ¼” square and the bottom layer of the square was 2 ½’ square.  I used a piece of double sided gold paper for the bottom layer because after the card is assembled, a small portion of the back of the square will be visible.

For the card bases I cut four pieces of desert storm cardstock to 4 1/2" x 11", then scored each piece at 1 3/4" and 7 1/8" and folded on the score lines to make tri-fold cards.

I stamped the Swirly Leaves stamp repeatedly on the card front with VersaMark ink and then embossed with Iridescent Sparkle embossing powder. 

To complete the cards I adhered the square stamped image to the front of the cards as shown in the picture above.  I added two accent strips of the same cardstock I used to mat the stamped image.  

Thanks for visiting my blog today.  I wish you the very best in the coming year.  

Magenta Products Used

CSET35 - Garden Flower Trio
85.020.N - Swirly Leaves


Other Products Used

VersaFine Olympia Green Ink

VersaMark Ink

Judikins Clear Embossing Powder

Prismacolor Pencils

(Leaves: PC911, PC913, PC989, PC907, PC909, PC912)

(Flowers: PC918, PC921, PC917, PC1002, PC926)

(Background:  PC992, PC1024)


Friday, September 4, 2020

Magenta Super Saturday - Mandala Slimline Card

Welcome back to Magenta Super Saturday and thank you for visiting my blog.  Slimline cards are really popular right now so I decided to make one for today’s post.  I used the Flower Mandala Background stamp and my stamp positioner.  I planned to stamp, then color with colored pencils, then re-stamp the image and emboss with gold embossing powder.  You can also see my card on the Magenta blog here

To make the layout for this card work, I had to do some math and some experimenting.  Since I wanted the stamped design to be centered I realized that I needed to cut the cardstock for the stamped image the same width as the stamp.  To begin, I cut a piece of 80# white cardstock to measure 4 ½” x 10 ¼”.  (This is the width of the stamp and twice the length of the stamp.)  


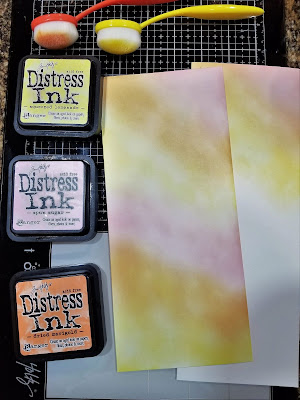
I blended Squeezed Lemonade, Spun Sugar and Dried Marigold Distress inks over the entire piece.  I also blended these same inks on a scrap of cardstock to use later for the sentiment.  

After the inks had dried, I placed the cardstock in the corner of my stamp positioner and stamped with VersaFine Toffee ink.  I rotated the paper and stamped the image again.  The bottom edges of the stamped images will almost touch in the middle of the piece of cardstock.

I colored all the mandalas with colored pencils (the colors I used are listed below), then returned the cardstock to my stamp positioner.  I used a powder tool over the entire piece, stamped with VersaMark, then embossed with Brutus Monroe Gilded Gold embossing powder.  I also stamped the thank you sentiment, embossed with gold embossing powder and cut it out with a 2” circle die.

To assemble the card, I began with the card base.  The final size of the card is 4” x 9”.  I cut the base cardstock to 8” x 9”, then scored and folded in half.  I cut a piece of orange cardstock to 3 ¾” x 8 ¾” and also cut a 2 ¼” circle for the backing of the sentiment.  The final size of the mandala piece is 3 ½” x 8 ½”, however, in order for the design to remain centered I cut equal amounts from each side of the piece.  I cut ½” from each long size and 7/8” from each end.  After assembling I added a few sequins for a bit of sparkle. 

Here are the final measurements:

Base card:  8"x9", scored and folded in half at 4" to make a card that measures 4" x 9"; Matting cardstock: 3 3/4" x 8 3/4"; Stamped image:  Original size was 4 1/2" x 1- 1/4", then cut to 3 1/2" x 8 1/2".

One note, I used 110# cardstock for my card base but this made the card weigh more than one ounce which increases the postage when you mail the card.  Using 80# cardstock will decrease the weight and should keep it under one ounce. 

If your stamp positioner can’t accommodate a longer piece of cardstock, you can skip the second stamping step.  


I also created some other panels with Distress inks and Distress Oxide inks.  Going left to right on the picture above I used I used Distress Oxide in Peacock Feathers, Evergreen Bough and Twisted Citron. When the ink was dry, I stamped and embossed with gold embossing powder, then used a Wink of Stella pen to color the mandalas for a bit of sparkle.  For the next panel I used Distress Shaded Lilac and Tumbled glass then colored with pencils (the colors are listed below) and embossed with gold embossing powder.  The middle panel is the one I used for today's card.  For the fourth panel I stamped my image, then used small blending brushes to shade the mandalas with Distress Oxide Picked Raspberry and Wilted Violet, then colored the open areas with Spun Sugar. When the ink was dry I restamped the image and embossed with gold embossing powder.  On the last panel, I blended Distress Oxide Twisted Citron, Evergreen Bough and Lucky Clover inks over the entire panel and when the ink was dry, I stamped and embossed with gold embossing powder.  I again used a clear Wink of Stella pen to apply sparkle on the Mandalas.  

This was a fun project and I ended up with several panels for more slimline cards.  I hope you will give it a try. Thanks for visiting my blog today.  

Magenta Products Used

0772.R
07.979.G


Other Products Used

Prismacolor Pencils (Panel 1: Carmine Red PC926; Yellowed Orange PC1002; Pale Vermillion PC921; Crimson Red PC924; Permanent Red PC122; Spanish Orange PC1003) (Panel 2: China Blue PC1100; Lilac PC956; True Blue PC903; Violet Blue PC933; Imperial Violet PC1007; Peacock Blue PC1027)

Distress Inks

Distress Oxide Inks

VersaMark Ink

Brutus Monroe Gilded Gold Embossing Powder

Wink of Stella

Friday, May 1, 2020

Magenta Super Saturday - Bluebird of Happiness


Welcome back to Magenta Super Saturday.  I hope you are all healthy and staying safe.   

I love the new “Warbler Spring” stamp from Magenta’s new collection. It just feels so happy and we can all use some happy right now.  You can also see my card on the Magenta blog here.
To create this card, I started by taping two pieces of white, 140# hot press watercolor paper to a board. I applied water to the entire surface with a large brush then added a bit of Viridian and Turquoise Blue watercolor paint from my new Elizabeth Craft watercolor set (I absolutely love these new watercolors!)  I wanted the color to be very subtle, so I moved it around on the paper until I was happy with the intensity.  
On one piece I tried to keep the center lighter since that is where the bird would be stamped.
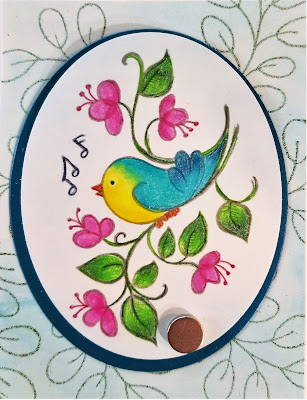
When the paper was dry, I put the piece with the lighter center in my stamp positioner and stamped the bird image using Hero Arts Soft Granite ink.  I colored the image with colored pencils. The hot press watercolor paper has a very smooth texture, so the coloring was very easy. I used my anti-static powder tool all over the image then returned the piece to my stamp positioner.  I re-stamped with VersaMark ink then embossed with clear embossing powder. I cut out the bird image with the 4 ¼” oval die from the Hero Arts Nested Oval die set then used the 4 3/8” die from the same set to cut a second oval from a piece Glamour Green So Silk cardstock.
I cut the second piece of watercolor paper to 4” x 5 ¼” then used a ruler to determine the center of the card and marked the center with a pencil.  I used the pencil mark as a reference point for the leaf stamp by aligning the stem of the acacia leaf with the pencil mark.  I stamped with VersaMark ink repeatedly around the card.  
After stamping the image a few times, I embossed with Ranger Verdigris embossing powder, then stamped a few more times and embossed again until I worked my way all around the card.  

When I finished the embossing, I wasn’t sure whether I wanted to color the leaves but ultimately decided to just lightly color them. 
I adhered the leaf piece to the front of an A2 card. Next, I adhered the two ovals together and before assembling I adhered an oval piece of fun foam to the back for a bit of dimension, then adhered to the top of the leaf piece.  I added a few light-colored sequins to reflect the light.
Thanks for visiting the blog today. Be sure to check out Magenta’s most recent release. You can see all the beautiful new stamps here and all the great stencils and masks here.

Magenta Products Used
40.348.N - Spring Warbler

0818.J - Acacia Branch Small
Other Products Used
Elizabeth Craft Watercolors
Ranger Verdigris Embossing Powder
Judikins Clear Embossing Powder
VersaMark Ink
Hero Arts Soft Granite Dye Ink
Prismacolor Pencils
So Silk Cardstock


Sunday, April 26, 2020

Hope


Welcome back to Magenta Super Saturday.  I hope you are all healthy and staying safe.  

In my card today I have used several stamps from Magenta’s newest release.  The sentiment stamp is an older one but I have always loved its message of hope and really think we can all use this message during these uncertain times.  You can also see my card over on the Magenta blog here.

For the card layout I wanted to arrange several images in a grouping, so I began by putting a piece of scrap paper in my stamp positioner.  I arranged the stamps and then stamped on the scrap paper to make sure I liked the arrangement.  Then I rearranged the stamps to cover the rest of the area.  I tried several different arrangements until I was happy with the pattern.  
  
Next, I put a piece of white cardstock in my stamp positioner and put the final scrap paper version on top.
I arranged the stamps for the first stamping using the scrap paper as a pattern. I removed the scrap paper and stamped a piece of 4 1/4" x 5 1/2" cardstock with VersaFine Olympia Green ink.  
I colored the images with Prismacolor pencils then returned the cardstock to my stamp positioner.  I restamped with VersaMark and embossed with clear embossing powder. 
When the embossed image had cooled, I returned it to my stamp positioner, put the scrap paper back on top, then arranged the stamps over the other section.  I followed the same process – ink, color, re-stamp and emboss over the second section. I adhered the panel to the front of an A2 card.
I splattered watercolor paints on another piece of white cardstock and let it dry.  Then I cut two strips - one to 5/8" x 5 1/2" and the other to 1 1/2" x 5 1/2". I stamped the sentiment on the larger piece with VersaFine Black Onyx ink and embossed with clear embossing powder.  
Next, I cut two strips of So Silk Beauty Pink cardstock.  One measured 3/4" x 5 1/2" and the second piece measured 1 5/8" x 5 1/2".  I adhered the smaller strip along the top of the card and the wider strip across the bottom of the card.  I adhered the white strips on top of the pink strips so that just the edge of the pink along the stamped images showed.
These stamps are just a few of the beautiful new stamps you can find in Magenta’s newest release.  You can see all the new stamps here and the new stencils and masks here.  Thanks for visiting my blog today. 
Magenta Products Used:
0814.G - Daisy Star Small

0816.G - Daisy Painted Small

0818.J Acacia Branch Small

0821.E - English Garden

07.513.I - Hope

Other Products Used:
VersaFine (Olympia Green, Onyx Black)
VersaMark
Judikins Clear Embossing Powder
Prismacolor Pencils
So Silk Cardstock

Friday, March 13, 2020

Layered Flowers


Welcome back to my blog and Magenta Super Saturday.  I’ve had to make several sympathy cards in the last month, so I thought I’d share this one with you today.  

I think any sentiment would work on this card and the technique is so much fun.  You color the flowers on one stamped image, then cut them out to adhere to a second stamped image. You can also see my card on the Magenta blog here.
To begin I used my MISTI to stamp the floral image.  I stamped it two times on pieces of 4” x 5 ¼” white cardstock.  Using a blender brush and some Distress Shaded Lilac ink, I lightly blended color over the flowers on both pieces.  It’s okay to go outside the lines on the one that will be your finished image as it adds some shading on the card, just use a light hand.  Next, I used colored pencils to color the flowers on the one piece.  On the other piece I used colored pencils on the leaves and berries.  I returned both pieces to my MISTI and restamped them with VersaMark ink, then embossed with white embossing powder. 
Next, I used my MISTI to stamp the sentiment in with VersaFine Majestic Blue ink on the piece with the colored leaves.  I adhered the panel to a piece of dark blue cardstock, then adhered them to an A2 card.   Finally, I cut out the flowers I had colored and used a few foam dots to adhere them on top of the flowers on card front.  I added a few gems for an additional bit of interest. 
Thanks for visiting my blog today.   
Magenta Products Used:
02.316.P - Poinsettia Corner

07.928.I - With Sympathy
Other Products Used:
Prismacolor Pencils
VersaFine Ink (Onyx Black, Majestic Blue)
VersaMark
Judikins White Embossing powder
Distress Shaded Lilac Ink

Friday, January 24, 2020

Valentine Kitty

Welcome back to Super Saturday.  Today I have a quick card for you and you can also see it on the Magenta blog here. 

I love cats; in fact, my whole family loves cats so I plan to give this card to my granddaughter.  She has a black special needs kitty that she adopted specifically because black cats have a lower adoption rate that other kitties.    

I used a stitched rectangle die to create a frame from a piece of 4 ¼” x 5 ½” white linen cardstock.  I used a blending brush to apply Spun Sugar and Worn Lipstick Distress ink around the inner and outer edges of the frame.  I wanted random hearts around the frame so I masked off the "15 Hearts" stencil so I could use just one heart.  Using a blending brush, I applied Spun Sugar, Worn Lipstick and Picked Raspberry, through the heart that was masked off.  I placed it in various places around the frame, sometimes using the whole heart and other times letting it run over the edge to make the placement look random.

I used my MISTI to stamp the "Cat on a Heart" stamp with VersaFine Black Onyx ink on a piece of white cardstock then colored it with Prismacolor pencils.  I returned it to my MISTI, stamped again with VersaMark ink then embossed with clear embossing powder.  This made the markings on the kitty stand out a little better.  

I put foam tape on the back of the frame and then centered it over the cat image.  I adhered this to an A2 card.  I added a few sequins and some glossy accents on the heart. 

Thanks for visiting my blog today.  

Magenta Products Used:
08.093.H - Cat on Heart

TM210 - 15 Hearts
Other Products Used:
Distress Ink (Spun Sugar, Worn Lipstick, Picked Raspberry)
Prismacolor Pencils
VersaMark Ink
VersaFine Black Onyx Ink
Glossy Accents