Showing posts with label Distress Oxide Ink. Show all posts

Friday, September 24, 2021

Magenta Super Saturday - O Christmas Tree!

Welcome back to my blog and Magenta Super Saturday.  Today I am using the new Christmas tree stamp from Magenta’s 2021 Holiday release.  You can also see my card on the Magenta blog here

I placed the stamp in my stamp positioner, stamped with VersaFine Black Onyx ink on a piece of white cardstock, then used Prismacolor colored pencils to color the image.  I returned the stamp to my stamp positioner, stamped with VersaMark ink, and embossed with Judikins Pine Twinkle embossing powder.  I shaded the outer edges around the tree with Distress Tumbled Glass Oxide ink. 
To create the frame, I cut a piece of red linen cardstock and two pieces of 65# white cardstock to 4” x 5 ¼”.  I stacked all three pieces together and cut them with the Penny Black Stitched Frames frame die.  This process ensures all three pieces are cut in the same position.  If the die doesn’t cut through all three pieces of cardstock, lift off the cut layer then just fit the die back into imprint on the next layer, and die cut again.  Glue all three layers together then trim down the stamped image to fit behind the frame.  Glue the frame to the stamped image, then to the front of an A2 card.  To finish I added some Nuvo White Blizzard glitter drops in the background for a bit more sparkle.

Magenta Products Used:


Other Products Used:
VersaFine Black Onyx Ink
VersaMark Ink
Judikins Pine Twinkle Embossing Powder
Penny Black Stitched Frames die set (#51-709)
Nuvo White Blizzard Glitter Drops
PrismaColor Pencils
Distress Oxide Tumble Glass Ink


Friday, September 3, 2021

Magenta Super Saturday - New Stamps!

Welcome back to Super Saturday.  Today I am using the beautiful bird stamp from Magenta’s most recent release of new stamps. You can also see my card on the Magenta blog here.

I used water-based TomBow markers to color the image on the back of vellum – I just love this technique. You can also used alcohol based markers (Copic) or colored pencils - each medium provides a beautiful result.  I cut a piece of 29# vellum to 4 ¼” x 5 ½”.  I used my powder tool very liberally over the surface, stamped the bird image using VersaMark, then sprinkled Brutus Monroe Gilded Gold embossing powder over the top.  To heat emboss the image I warmed up my heat gun for about 30 seconds then kept it moving over the entire surface of the paper to slowly melt the embossing powder without warping the vellum. 

I selected several green markers and began coloring the leaves on the back side of the stamped image.  It takes a bit longer for the ink to dry on the vellum which provides more time for blending the colors.  I've listed all the colors I used below.

Once I completed the leaves I moved on to the bird, berries, and the fence posts. 
I wanted a colored background for the bird and at first I thought about coloring in that area on the vellum.  Instead, I blended Tumbled Glass and Mermaid Lagoon Distress Oxide inks onto a piece of white cardstock, putting the lighter color in the center, and the darker color around the outer edges.  This will go under the vellum layer to create blue shading.  
I used 4 3/8” and 4 5/8” oval dies from the Hero Arts Infinity Dies to create a frame for the bird.  To create this look, I cut a piece of white cardstock and green cardstock to 4 ¼” x 5 ½”.  I used the 4 5/8” oval die to cut the opening in the white cardstock, then adhered this to the green cardstock.  I centered the smaller oval die in the opening, taped it down and ran it through my die cut machine. 
Next, I adhered the bird, embossed side up, to the back of the frame, adhered this to the inked blue background and finally adhered them to the front of an A2 card. 

Magenta Products Used:
0827
The new stamps aren't available in the store yet so to order them, please e-mail Magenta and provide the stamp number.

Other Products Used:
Brutus Monroe Gilded Gold embossing powder
TomBow Markers ((Leaves: 245, 346, 195); (Bird: 25, 885, 905, 847): (Berries: 847, 565); (Fence 899, 977))
Distress Oxide Ink (Tumbled Glass, Mermaid Lagoon)
VersaMark
Hero Arts Infinity Dies - Nested Oval 


Friday, December 11, 2020

Magenta Super Saturday - Holiday Peace

Welcome back to Magenta Super Saturday – thank you for visiting.  Today I have a fun Christmas card which you can also see on the Magenta blog here.  After stamping with Distress ink, I used Tombow markers to enhance the image.

I began by cutting a piece of white cardstock to 4 1/8” x 5 3/8”.  I used a blending brush to cover the cardstock with Tumbled Glass Distress Oxide ink.  Next, I blended Salty Ocean Distress Oxide around the outer edge, approximately 1” from each side.  Last, I blended Chipped Sapphire Distress Oxide along the very edge of the cardstock.  I set the piece aside to dry thoroughly because the next step involves embossing powder.  An easy way to see if the ink has dried thoroughly is to sprinkle some embossing powder on it, then tap it off.  If the powder sticks, the ink isn't dry. 

After the cardstock was dry, I placed it in my MISTI and used my powder tool liberally over the entire surface.  I positioned the Leafy Wreath stamp on the cardstock, then used Bundled Sage Distress Ink to stamp it.  I used this light color so because it wouldn't overpower the red shades I planned to use on the berries in the second step of this technique.) I left the stamp and cardstock in place and used Tombow markers directly on the stamp (all the colors are listed below.)  The MISTI is a great tool for this technique because you can stamp repeatedly until you are happy with the color on your image.  
I began by using red shades on the berries – I colored the berries on the stamp, then stamped and repeated until I was happy with the color of the berries.  
I followed the same process for the leaves by coloring the leaves with three different shades of green. I began with a light green and then added dark green accents.  I did a few leaves at a time until I was happy with the results. 

Leaving the stamp in the MISTI, I cleaned it thoroughly, then used Versamark to stamp the wreath again on top of the colored image.  I embossed the wreath with clear embossing powder. The embossing powder really made the colors darker and deeper.  I positioned the sentiment stamp in the center, stamped with VersaMark, then embossed with gold embossing powder.  To finish, I made a mask of the stamp, placed it over the wreath then splattered gold paint over the open areas. 

To finish, I layered the card front on a piece of gold cardstock, then adhered the panel to an A2 card.  This technique works great with solid stamps like this where you want to use more than one color on the image.

I hope you and your loved ones have a happy and healthy holiday season. 

 Magenta Products Used:
02.315.P - Leafy Wreath

07.990.G - Peace Love Joy

Other Products Used:
Distress Oxide Ink (Tumbled Glass, Salty Ocean, Chipped Sapphire)
Distress Ink (Bundled Sage)
VersaMark Ink
Judikins Embossing Powder (Clear and Gold)
Tombow Markers (Cherry (#815); Crimson (#847); Light Green (#195); Dark Green (#277); Sap Green (#245))


Friday, September 4, 2020

Magenta Super Saturday - Mandala Slimline Card

Welcome back to Magenta Super Saturday and thank you for visiting my blog.  Slimline cards are really popular right now so I decided to make one for today’s post.  I used the Flower Mandala Background stamp and my stamp positioner.  I planned to stamp, then color with colored pencils, then re-stamp the image and emboss with gold embossing powder.  You can also see my card on the Magenta blog here

To make the layout for this card work, I had to do some math and some experimenting.  Since I wanted the stamped design to be centered I realized that I needed to cut the cardstock for the stamped image the same width as the stamp.  To begin, I cut a piece of 80# white cardstock to measure 4 ½” x 10 ¼”.  (This is the width of the stamp and twice the length of the stamp.)  


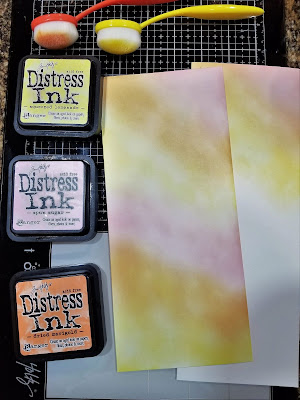
I blended Squeezed Lemonade, Spun Sugar and Dried Marigold Distress inks over the entire piece.  I also blended these same inks on a scrap of cardstock to use later for the sentiment.  

After the inks had dried, I placed the cardstock in the corner of my stamp positioner and stamped with VersaFine Toffee ink.  I rotated the paper and stamped the image again.  The bottom edges of the stamped images will almost touch in the middle of the piece of cardstock.

I colored all the mandalas with colored pencils (the colors I used are listed below), then returned the cardstock to my stamp positioner.  I used a powder tool over the entire piece, stamped with VersaMark, then embossed with Brutus Monroe Gilded Gold embossing powder.  I also stamped the thank you sentiment, embossed with gold embossing powder and cut it out with a 2” circle die.

To assemble the card, I began with the card base.  The final size of the card is 4” x 9”.  I cut the base cardstock to 8” x 9”, then scored and folded in half.  I cut a piece of orange cardstock to 3 ¾” x 8 ¾” and also cut a 2 ¼” circle for the backing of the sentiment.  The final size of the mandala piece is 3 ½” x 8 ½”, however, in order for the design to remain centered I cut equal amounts from each side of the piece.  I cut ½” from each long size and 7/8” from each end.  After assembling I added a few sequins for a bit of sparkle. 

Here are the final measurements:

Base card:  8"x9", scored and folded in half at 4" to make a card that measures 4" x 9"; Matting cardstock: 3 3/4" x 8 3/4"; Stamped image:  Original size was 4 1/2" x 1- 1/4", then cut to 3 1/2" x 8 1/2".

One note, I used 110# cardstock for my card base but this made the card weigh more than one ounce which increases the postage when you mail the card.  Using 80# cardstock will decrease the weight and should keep it under one ounce. 

If your stamp positioner can’t accommodate a longer piece of cardstock, you can skip the second stamping step.  


I also created some other panels with Distress inks and Distress Oxide inks.  Going left to right on the picture above I used I used Distress Oxide in Peacock Feathers, Evergreen Bough and Twisted Citron. When the ink was dry, I stamped and embossed with gold embossing powder, then used a Wink of Stella pen to color the mandalas for a bit of sparkle.  For the next panel I used Distress Shaded Lilac and Tumbled glass then colored with pencils (the colors are listed below) and embossed with gold embossing powder.  The middle panel is the one I used for today's card.  For the fourth panel I stamped my image, then used small blending brushes to shade the mandalas with Distress Oxide Picked Raspberry and Wilted Violet, then colored the open areas with Spun Sugar. When the ink was dry I restamped the image and embossed with gold embossing powder.  On the last panel, I blended Distress Oxide Twisted Citron, Evergreen Bough and Lucky Clover inks over the entire panel and when the ink was dry, I stamped and embossed with gold embossing powder.  I again used a clear Wink of Stella pen to apply sparkle on the Mandalas.  

This was a fun project and I ended up with several panels for more slimline cards.  I hope you will give it a try. Thanks for visiting my blog today.  

Magenta Products Used

0772.R
07.979.G


Other Products Used

Prismacolor Pencils (Panel 1: Carmine Red PC926; Yellowed Orange PC1002; Pale Vermillion PC921; Crimson Red PC924; Permanent Red PC122; Spanish Orange PC1003) (Panel 2: China Blue PC1100; Lilac PC956; True Blue PC903; Violet Blue PC933; Imperial Violet PC1007; Peacock Blue PC1027)

Distress Inks

Distress Oxide Inks

VersaMark Ink

Brutus Monroe Gilded Gold Embossing Powder

Wink of Stella

Friday, July 17, 2020

Magenta Super Saturday - Sparkling Flowers


Welcome back Magenta Super Saturday.  I had so much fun with today’s card so I hope you will enjoy it. You can also see my card on the Magenta blog here.
 In addition to using Magenta’s beautiful stencils, I also used a couple of new products – the newest color of Distress Ink called Specked Egg and Stickles Glitter Gel.  I really love the newest color in the Distress ink line.  The Stickles Glitter Gels are filled with glitter and other chunky pieces of metallics that really sparkle. 
I began by cutting a piece of 110# white cardstock to 4 1/8” x 5 ¼” then I used a blending brush to cover the entire piece with Distress Speckled Egg ink.  Next, I applied Distress Broken China around the outer edges, making a border of approximately 1” around the edges.  Finally, I blended Distress Mermaid Lagoon ink along the very outer edges. 


When the cardstock was very dry, I stamped “Happy Birthday” in the center of the card using VersaFine Black Onyx ink, then embossed with clear embossing powder.  I die cut the center of the card using an oval stitched die and set the oval piece aside for later.

I taped the Petal Blossoms stencil to the front of the cardstock and blended Distress Wilted Violet over the top. 

I removed the stencil and wiped the excess ink away, then repositioned the stencil on the cardstock.  Using a palette knife, I applied Stickles Solar Flare Glitter Gel over the top. 

I gently lifted the stencil from the paper and placed it and the knife in some warm, soapy water.  I wiped the gel from the edges of the card and set it aside to dry. 
When the gel was dry, I adhered the cardstock to the front of an A2 card. I adhered the oval sentiment to a piece of fun foam and then positioned it in the cutout area of the card. 

I also created a second card using Distress Oxide inks in the same colors.  For the stenciling I used the leaves template from the Floral Background Trio stencil set and Distress Mowed Lawn Oxide Ink and then applied Stickles Supernova Glitter Gel over the top of the stencil.
Thanks for visiting my blog today!

Magenta Products Used:
TM334 - Petal Blossoms

TM27 - Trio Templates Floral Background
07.975.I - Happy Birthday Large

Other Products Used:

Distress Ink (Speckled Egg, Mermaid Lagoon, Broken China and Wilted Violet)
Distress Oxide Ink (Speckled Egg, Mermaid Lagoon, Broken China and Wilted Violet)
Ranger Stickles Glitter Gel (Solar Flare and Supernova)
VersaFine Black Onyx Ink


Friday, March 8, 2019

Magenta Super Saturday - Spring is coming!


Welcome back to Super Saturday.  You can also see today’s post on the Magenta blog here.  We’ve received a record-breaking amount of snow in the Pacific Northwest in February.  I was snowed in for a few days, so I decided to make a card to remind me spring was coming soon.   


To create this card, I made a mask by stamping the Potted Flowers on a piece of masking paper and then cutting it out.  In my MISTI stamp positioner I lined up the stamp where I wanted it on a piece of 4 ¼” x 5 ½” white cardstock and then placed the mask over that area.  


Using an ink blending tool I lightly applied Shabby Shutters and Tumbled Glass Distress Oxide inks around the mask – be sure to use a light touch so that you don’t get a ridge of ink that can’t be blended away.  

I removed the mask and added more ink, overlapping lightly into the area that would be stamped.  I added Broken China and a touch of Faded Jeans Distress Oxide ink to the blue part of the background and blended until there was a smooth transition of color.  

When the ink was dry, I returned the cardstock to my Misti and stamped the Potted Flowers with VersaFine Black Onyx ink.  

When the ink was dry, I colored the image with colored pencils (the colors are listed below.)  I returned it to my MISTI one last time, stamped with VersaMark ink, then embossed with clear embossing powder.  Lastly, sprinkled a bit of water over the blue inked area. 

I trimmed the image down and matted it to a piece of black cardstock and then to a piece of purple cardstock before adhering it to a white, A2 card.  I added a few clear Nuvo drops on the petals and leaves. 

For the sentiment I shaded a piece of white cardstock with Tumbled Glass and Shabby Shutters Distress Ink.  When the ink was dry, I stamped the sentiment with VersaFine Black Onyx ink and embossed with clear embossing powder.  I trimmed the sentiment down and added it to the card with a piece of foam tape for some extra dimension. 

Thanks for visiting my blog today!
Magenta Products Used:

0586.Q Potted Flowers
07.952.F Sending Sunshine

Other Products Used:


Prismacolor Pencils (Pale Sage, PC 1089; Peacock Green, PC907; Spring Green, PC913; Magenta, PC930; Crimson Lake, PC925; Mulberry, PC 995; Deco Pink, PC 1014; Lilac, PC 956; Parma Violet, PC1008; Yellowed Orange, PC1002; Spanish Orange, PC1003; Orange, PC 918; Pale Vermillion, PC921)
Distress Oxide Inks (Shabby Shutters, Tumbled Glass, Broken China, Faded Jeans)
VersaFine Onyx Black ink
VersaMark 
Nuvo Drops

Wednesday, July 11, 2018

Getting started...

Well folks, I finally did it, I've finally started my own blog.  This site will be "under construction" for a while so I hope you will bear with me as I continue to tweak the layout and content.  I'm really looking forward to "sharing art" with you.

Today I'm sharing a card using a beautiful Elizabeth Craft die and Elizabeth Craft Microfine Glitter.  I recently had the opportunity to work in the Elizabeth Craft booth at the Puyallup Stamp and Scrapbook Expo where I got to see their beautiful dies, stamps, and new glitter colors plus lots of amazing sample cards that featured their products.  This particular video from Elizabeth Craft inspired my cards:  https://www.youtube.com/watch?v=HzGWhAsed_g


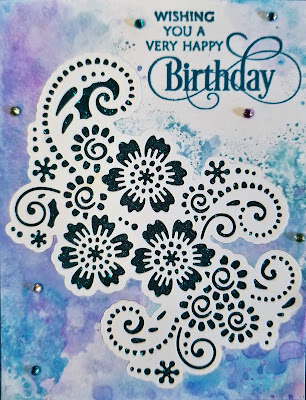
The great thing about this technique is that you end up with two cards.  To get started, I used VersaFine Clair Warm Breeze Ink to stamp a sentiment from the Penny Black Special Thoughts (30-338) stamp set, in the upper right corner of a panel of white cardstock cut to 5 1/4" x 4".  I embossed the sentiment with Judikins Clear Embossing Powder.  (I love the new VersaFine Clair inks!  They colors are amazing and they also work great with embossing powders.  I plan to be doing lots more with these inks.)

Next I applied Distress Oxide inks (Mermaid Lagoon, Broken China and Wilted Violet) to a craft mat and sprayed it lightly with water.  I cut a mask for the sentiment from a sticky note and placed it over the sentiment on the card panel.  I dabbed the panel into the Oxide ink, working around the sentiment, then dried it with a heat gun.  I repeated this process two more times until I got the depth of color I wanted.

I die cut the panel with the Elizabeth Craft Flower Lace 2 die.  I also die cut a second piece from a panel of white cardstock that had been cut to 5 1/4" X 4".  This gives you two die cuts and two open panels.  To the back of the Oxide Ink panel, I applied a piece of Elizabeth Craft double sided adhesive, cut slightly smaller than the panel.  I turned it over, sticky side up and pieced in the white die cut, pressing it into the adhesive firmly.  Then I put the panel on a coffee filter and sprinkled Elizabeth Craft Blue Streak MicroFine glitter over the panel.  Tap off the excess glitter and burnish it with your finger.  The more you burnish the glitter, the more it will shine.  Wipe off the panel with a microfiber cloth.

To finish the card, I adhered the panel to a piece of Glamour Green So Silk cardstock and then adhered it to an A2 size card.  I added a few gems for accents.


For the second card, I followed the steps above and pieced the Oxide ink die cut into the white cardstock panel.  I used Elizabeth Craft Amethyst Microfine glitter and in addition to gems, I also used the swirls from the die cut for additional accents.

Products I used:

Elizabeth Craft Flower Lace 2, #1383
Elizabeth Craft Microfine Glitter (Blue Streak, Amethyst)
Penny Black Special Thoughts, #30-338
Distress Oxide Ink (Mermaid Lagoon, Broken China, Wilted Violet)
VersaFine Clair Ink, (Warm Breeze)
Judikins Clear Embossing Powder
So Silk Cardstock

I really loved how easily these dies cut through the cardstock.  It would be easy to make several of these cards, with or without a sentiment.

Thank you so much for visiting my blog.  I hope you will visit again.