Showing posts with label Judikins Detail Gold Embossing Powder. Show all posts

Friday, June 14, 2019

Super Saturday with Pam – Spring Flowers


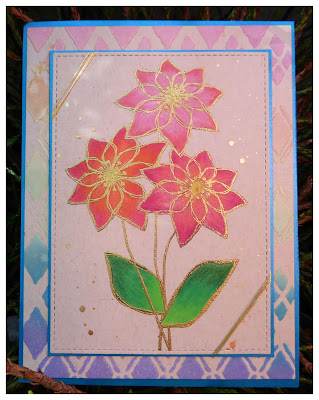
Welcome back to Super Saturday.  I love using Distress Oxide Inks and colored pencils on kraft cardstock because the colors really pop.  I combined both this week, along with a stencil and stamp from the Magenta Spring Collection.  You can also see my card on the Magenta blog here.


I embossed Magenta stencil TM309 with my Big Shot die cutting machine.  The recipe is base plate open to Tab 1, base cutting plate, rubber embossing mat, cardstock, stencil, cutting plate. 

Depending on your machine, you may also need to add a shim to get enough pressure to emboss the stencil design on the cardstock.
I taped the cardstock to the stencil, the used a blending brush to apply Distress Oxide inks, overlapping the colors slightly to blend the colors. 
I removed the stencil and set the piece aside to dry.

On another piece of kraft cardstock I stamped the Magenta stamp (#14.676) with VersaFine Sepia ink in my MISTI and left the stamp in place.  I colored the image with various Prismacolor pencils.  I ran my powder tool over the image then put the cardstock back in the MISTI. I stamped again with VersaMark ink, then embossed with gold embossing powder.

I masked off the stamped floral image then splattered gold ink over the piece. After the ink dried I wrapped gold thread around the opposite corners several times. 

To assemble the card I adhered the stenciled image to a piece of Glamour Green So Silk cardstock and adhered them to an A2 card.  I adhered the stamped image to a piece of Glamour Green So Silk cardstock, then adhered them to the card. 

This technique with stencils is so versatile.  I hope that you will give it a try.  Thanks for visiting my blog today!

Magenta Products Used:
Stencil TM309
Stamp 14.676

Other Products Used:
Distress Oxide Ink (Picked Raspberry, Spiced Marmalade, Squeezed Lemonade, Twisted Citron, Mermaid Lagoon, Wilted Violet)
Prismacolor pencils (Grass Green PC909; Spring Green PC913, Dark Green PC908, Magenta PC930, Carmine Red, PC926, Rose PC929, PaleVermilion PC921, Lemon Yellow PC915)
VersaMark Ink
Judikins Detail Gold Embossing Powder
Saturday, October 27, 2018

Magenta Super Saturday with Pam and Dianne - Artist Training Coins


07.1009.J
Welcome back to Magenta Super Saturday.  Today I’m doing another joint post with Dianne Johnson featuring Magenta’s new ATCoins.  You can see our post on the Magenta blog here and you can see all of Dianne’s coins on her blog here.

Have you signed up for the ATCoin swap yet?  I think it will be so much fun to receive these coins in the mail from someone I’ve never met.  There are still a few days left to sign up and you can read about the whole swap here.  I’ve been having so much fun with these coins – they are really kind of addictive. 

I continued my Christmas theme on my next two coins.
I started by sprinkling Lagoon, Raspberry, Turquoise and Jade Nuance powder on the smooth side of watercolor paper and the spraying with water.  I purposely left some white spaces.

When the paper was dry, I positioned “Peace, Love and Joy”, a stamp from Magenta’s new stamp collection, on an area of the paper that contained some white space.  Before stamping I used anti-static powder over the surface of the paper.  Then I stamped with VersaMark and embossed with Judikins Detail Gold embossing powder.  I die cut the image with a 2 ½” circle die.  I ran the edge of the coin across the VersaMark ink pad and then embossed the edge with gold embossing powder.

I stamped the coin stamp on a separate piece of cardstock and die cut it with a 2 ½” die.  I colored with Prismacolor pencils and then outlined the flowers and stems with a gel pen.  I adhered it to the back of the Nuance piece after the gel pen dried.
For my next coin, I used “Joy”, another beautiful Sally Penley calligraphy stamp from Magenta’s new collection.  

I used my MISTI to stamp it on a piece of white cardstock with VersaFine Toffee ink.  When it was thoroughly dry, I highlighted the white space around the sentiment with Tumbled Glass Distress ink.  

I positioned the stencil above the sentiment then applied Twisted Citron and Mowed Lawn Distress ink.  

I moved the stencil to the bottom of the sentiment and colored again.  

After the ink dried I used green Prismacolor pencils to add additional colors to the leaves.  I used Peacock Green (PC907), Grass Green (PC909) and Apple Green (PC912).  I also used Crimson Red (PC924) on the berries.  I used anti-static powder on the image and then put in back in my MISTI.  I re-stamped “Joy” over the original image with VersaMark and embossed with Wow Metallic Copper embossing powder.  (I embossed after inking the stencils, so ink wouldn’t distort the sparkle of the embossing powder.)  I die cut the image using a 2 ½” circle die. I also highlighted the edge of the coin by running the edge across the VersaMark pad and then embossing with the copper embossing powder.


For the back of the coin, I stamped the ATCoin stamp on a piece of white cardstock.  I colored with Prismacolor pencils and highlighted with a gel pen.  I die cut it with 2 ½” die and adhered it to the stenciled piece.  For the last step, I used Christmas Red Stickled on the berries around "Joy" which added some sparkle.

The coins work well for almost any image, large or small.  You don’t have to put the whole image on the coin; they look great with a portion of the image on the coin, too.  I hope you will give it a try and consider joining the swap.


Magenta products used:
07.990.G

 
TM256

MNU001
MNU004
MNU007
 Other products used:
Distress Inks (Tumbled Glass, Twisted Citron, Mowed Lawn)
Prismacolor Pencils
Stickles
Judikins Detail Gold Embossing Powder
Wow Metallic Copper Embossing Powder


Friday, August 10, 2018

Magenta Super Saturday with Pam


Hi everyone!  I’m so excited to be joining the “Super Saturday” group on the Magenta Blog.  I love the new Magenta collection that will be coming out very soon.  The card I’m sharing with you today features the “3 Poinsettias – 3 Flowers” (03.218.Q) and the medium “Thank You” (07.979.G) stamp that was designed by calligrapher Sally Penley.  Both of these stamps are from the new collection.  This beautiful poinsettia stamp is so versatile that I’m sure I’ll be using it all year!


I made the background using a variation of a technique that I saw on a Jennifer McGuire video. I used Distress Ink mini pads to cover a large acrylic block with splotches of color.  I sprayed it very liberally with water, then put the block, ink side down on the smooth side of a piece of Tim Holtz watercolor paper.  I pressed the block to move the ink around over the whole piece of paper, then put something heavy on top of the block and let it sit for a few minutes for the colors to sink into the paper.   When I lifted the block off the paper, I used a paper towel to wick up any of the ink drops I didn't want on the finished piece.  This technique is so much fun (and fast!) that I usually make several pieces to have on hand when I need them. 

This example uses Dried Marigold, Carved Pumpkin and Festive Berries Distress Inks.


Finished panel after the ink has dried.


You can vary the color pattern, and intensity of color on the background by the colors you choose, the way you apply the ink (randomly or in a pattern), the amount of water you use and amount of time you leave the block sitting on the paper.  To see more on this technique, check out the video on Jennifer McGuire’s website here.


For today's card I used a piece of background paper from my stash that had been created with Broken China, Tumbled Glass and Wilted Violet Distress Inks on Tim Holtz Watercolor paper.  I used the MISTI stamp positioner to stamp the Poinsettia image with VersaFine Smokey Gray ink.  When the ink was dry I colored in the flowers with Luminance colored pencils (Manganese Violet, Violet, White, Orange, White.)  I put the watercolor panel back in the stamp positioner in the same place.  Then I restamped the poinsettia image plus the “Thank you” sentiment with VersaMark ink, then embossed with Judikins Gold Detail embossing powder.

You can also see my card on the Magenta blog here.  While you are there check out all the amazing art work the Magenta Design Team has created with all the beautiful new stamps from their upcoming collection.

Magenta Products Used:  
02.318.Q 3 Poinsettias - 3 Flowers 

07.979.G Thank you - Medium 
Other Products Used:
Distress Inks (Wilted Violet, Broken China, Tumbled Glass)
Versamark Ink
VersaFine Ink (Smokey Gray)
Tim Holtz Watercolor Paper
Judikins Detail Gold Embossing Powder
Luminance Colored Pencils (Manganese Violet, Violet, White, Orange)

Thanks for visiting my blog today.    I hope you will come back soon.


Monday, July 30, 2018


Hi there!  Welcome back to my blog where I’m sharing my second card as a Magenta Guest Designer which you can also see on their blog here.


For this card I used two Magenta stamps that were released several years ago but they are a couple of my favorite stamps.  The vertical “Happy Birthday” is very useful with many different stamps and the floral tile stamp looks beautiful when colored with watercolors, Copic markers, or colored pencils.

To create this card, I stamped the “Floral Tile” stamp and the “Happy Birthday” stamps on two separate pieces of smooth, black cardstock with VersaMark ink. I also used a VersaMark Pen to add small dots of ink around the “Happy Birthday” image, somewhat like the dots around the flowers on the “Floral Tile” stamp.  Next, I heat embossed the images with detail gold embossing powder.


I used the Finetec Pearlescent Watercolors for the flowers and leaves.  The shimmer of these vivid colors really come to life on dark cardstock.  Since I used cardstock, rather than watercolor paper for this card, I used the water very sparingly. 
After the paint dried, I cut a piece of gold metallic cardstock to 4” x 5 ¼” and adhered it to the front of an A2 card.  I cut the “Happy Birthday” image to 3 ¾” x 1 ½” and the “Floral Tile” image to 3 ¾” x 3 ½” and adhered them to the gold cardstock.   


 Magenta Products Used
R.0427

07.430.I

Other Products Used:
Finetec Pearlescent Watercolors
VersaMark Ink Pad and Pen
Judikins Detail Gold Embossing Powder